Year: 2021
jQuery is Not Defined in WordPress
Hiding order fields depending on the selected delivery method WooCommerce
Replacing currency sign with letters Woocommerce
Platform installation Orchid – Laravel Admin Panel
- Create a project
- Add dependency
- Platform installation
- Create user
- Start local server
- Publishing resources
- Updating
- What to do next?
Before you can use the platform, you need to install it. This guide should help you perform a simple installation to start the project.
Create a project
Note. If you already have Laravel installation, you can skip this step.
Being a package for the framework, you must first install Laravel. This can be done using the Composer dependency management tool by running the composer create-project command in your terminal:
$ composer create-project laravel/laravel orchid-project "8.*" --prefer-dist
For more information on how to install Laravel, follow Official Laravel Installation Guide.
Don’t you have Composer? It’s easy to install by following the instructions on the download page.
It will create a new orchid-project directory, load the dependencies, and generate the leading directories and files you need to get started. In other words, install your new framework project.
Do not forget
- Set “chmod -R o+w” rights to the
storageandbootstrap/cachedirectories - Edit the
.envfile
Note. If you just installed Laravel, you may need to generate a key with command
php artisan key:generate
Add dependency
Go to the created project directory and run the command:
$ composer require orchid/platform
Note. You also need to create a new database, update the
.envfile with credentials, and add your application’s URL to the variableAPP_URL.
Platform installation
Note. The installation will overwrite the
app/Models/Usermodel.
Run the installation process by running the command:
php artisan orchid:install
Create user
To create a user with maximum permissions, you can run the following command with a username, email, and password:
php artisan orchid:admin admin admin@admin.com password
Start local server
If you haven’t installed a server (Nginx, Apache, etc.) to run the project, you can use the built-in server:
php artisan serve
Open a browser and go to http://localhost:8000/admin. If everything works, you will see the control panel login page. Later you can stop the server by pressing Ctrl + C in the terminal.
Note. Suppose your runtime uses a different domain (e.g., orchid.loc). In that case, the admin panel may not be available. You need to specify your domain in the configuration file
config/platform.phpor.envfile. It allows you to make the admin panel available on another domain or subdomain, such asplatform.example.com.
Publishing resources
By default, static files (css / js) are delivered via app routes. It is the best balance between configuration and change tracking, but you can specify web servers for distribution. To do this, you need to run a command that creates a symbolic link in the public directory. Please only use it if your web server is having problems:
php artisan orchid:link
Problems encountered during installation? It is possible that someone already had this problem https://github.com/orchidsoftware/platform/issues. If not, you can send a message or ask for help.
Updating
While in the project directory, use Composer to update the package:
composer update orchid/platform --with-dependencies
Note. You can also update all your dependencies listed in the
composer.jsonfile by runningcomposer update.
Installing ext-dom PHP7
First of all, read the warning! He says don’t run composer as root! Second, you are probably using Xammp on your local machine, which has the required php libraries by default.
But on your server you are missing ext-dom. php-xml has all the required bundled packages. Thus, you can simply install it by running:
sudo apt-get update
sudo apt install php-xml
Most likely you are missing mbstring too. If you get an error, install this package also with:
sudo apt-get install php-mbstringThen install:
composer update
composer require cviebrock/eloquent-sluggable
For those who want to install ext-dom on php 7.1 and above, run this command:
sudo apt install php-xmlHow to insert shortcode into PHP
Show password by icon
Create tab tabs for product cards WooCommerce
This plugin extends to allow shop owners to add custom tabs to products. The tabs are displayed on the individual product pages to the right of the default “Description” tab.
Individual product tabs are managed on the WooCommerce Edit Product screen and can be added on a per product basis. You can also create saved tabs and add them to multiple products as needed. Tabs can be easily added, deleted and rearranged.
Tab content areas use the standard WordPress text editor and may contain text, images, HTML or shortcodes.
https://wordpress.org/plugins/yikes-inc-easy-custom-woocommerce-product-tabs/
Hide WordPress widgets on mobile
The easiest way is to use the Widget Options Plugin which can hide widgets on mobile and other devices. It’s free in the repository: https://wordpress.org/plugins/widget-options/
Below you can see the options

SQL queries to transfer a WordPress site to another domain
Describing SQL Queries
In general, there are three main requests (there is a fourth request in the screenshot, but about it a little later). So, https://test.onmywaystudio.net/ is the old domain, https://omwagency.com/ is the new one.
WordPress database table names are prefixed. By default, this is wp_, but on your site the prefix can be absolutely anything, for example, your wp_posts table may be called omw_posts or qwertyposts, keep that in mind.
UPDATE wp_options SET option_value = REPLACE (option_value, ‘https://test.onmywaystudio.net/’, ‘https://omwagency.com/’) WHERE option_name = ‘home’ OR option_name = ‘siteurl’;
UPDATE wp_posts SET post_content = REPLACE (post_content, ‘https://test.onmywaystudio.net/’, ‘https://omwagency.com/’);
UPDATE wp_postmeta SET meta_value = REPLACE (meta_value, ‘https://test.onmywaystudio.net/’,’https://omwagency.com/’);
Redirect after a successful order in the store
The redirect can be done by adding this code to the function.php of your theme.
add_action( 'template_redirect', 'woo_custom_redirect_after_purchase' );
function woo_custom_redirect_after_purchase() {
    global $wp;
    if ( is_checkout() && !empty( $wp->query_vars['order-received'] ) ) {
        wp_redirect( 'URL куда будем делать редирект' );
        exit;
    }
}
Now you can simply create a “thank you for order” page and arrange it as you like.
Install Symfony Framework
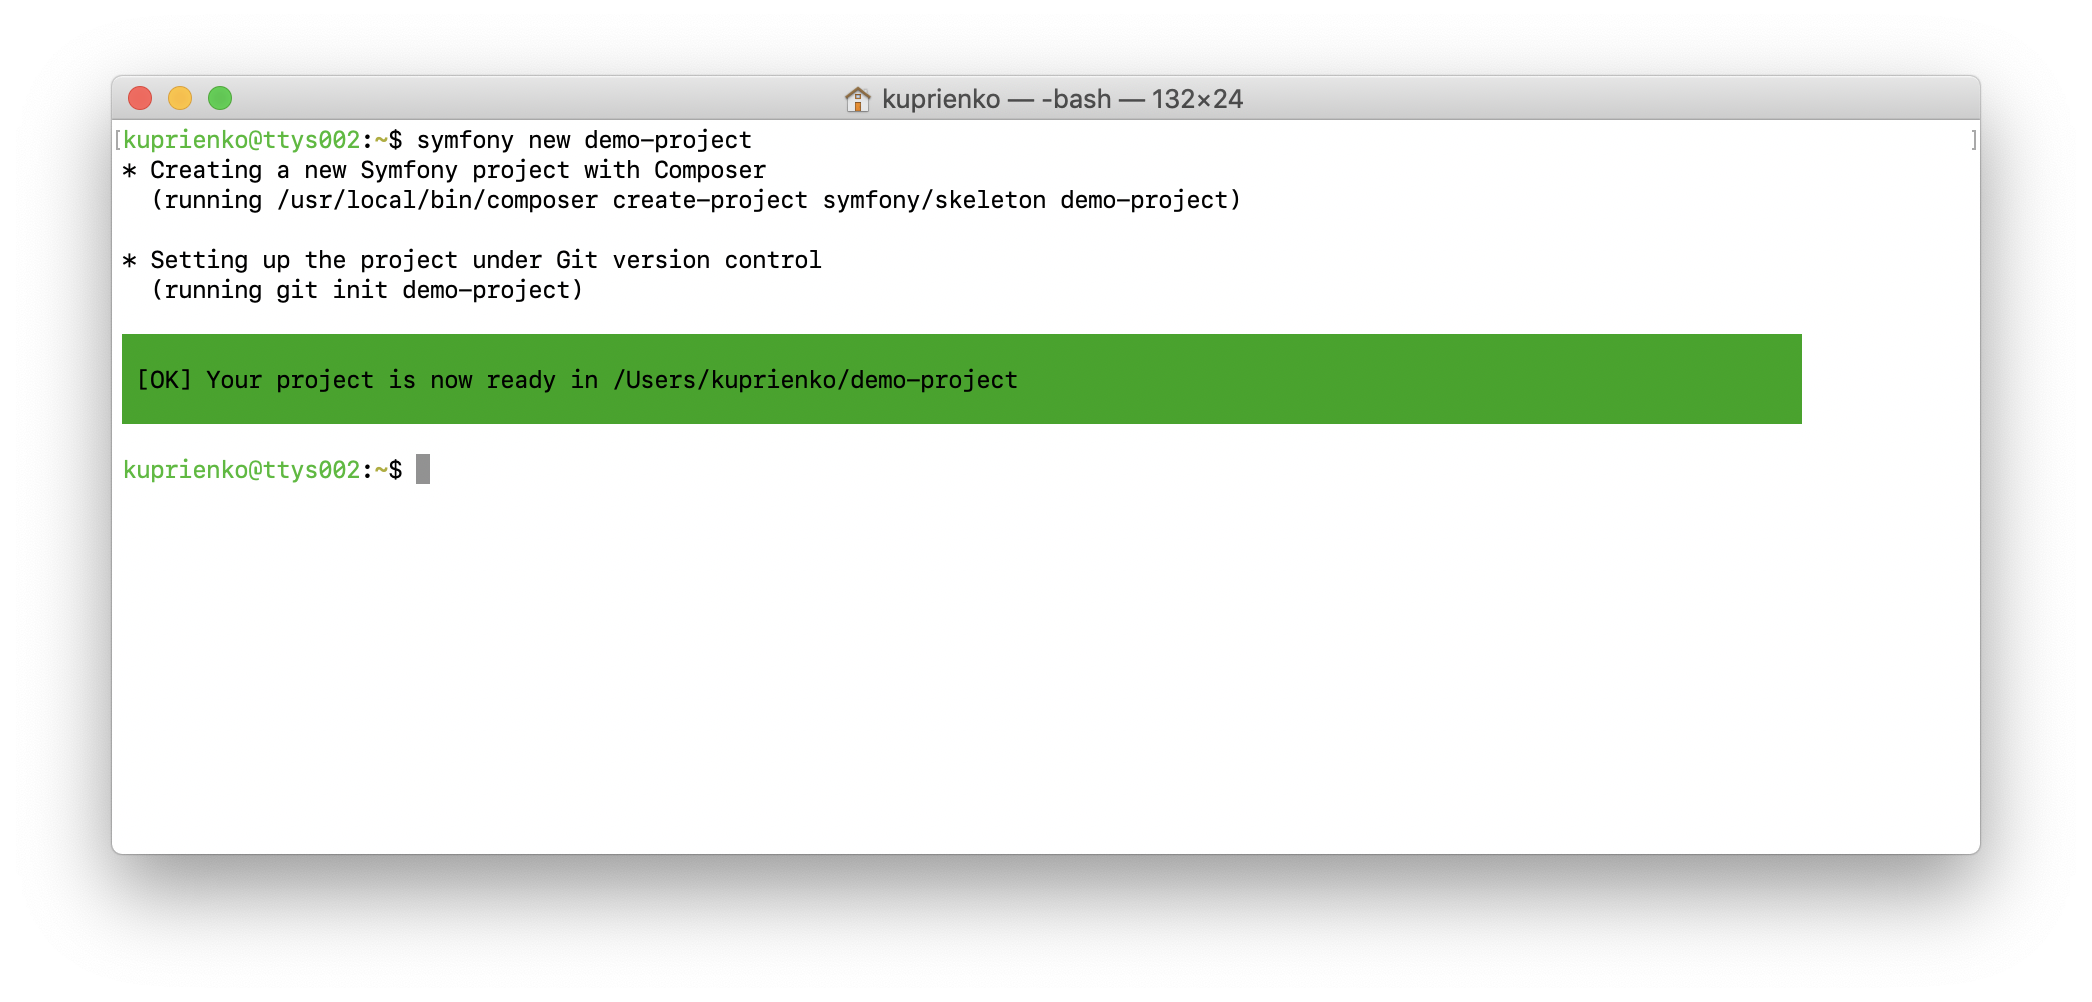
Создание проекта
Чтобы создать новый Symfony проект, основанный на одном из официальных шаблонов, нужно запустить команду:
$ symfony new [--full | --demo] <path-to-project>
По умолчанию используется минимальный шаблон skeleton. Чтобы установить website-skeleton нужно запустить команду с опцией --full. Соответственно, для установки demo проекта необходимо запускать команду с опцией --demo.
Под капотом symfony new выполняет команду composer create-project, затем инициализирует новый Git репозиторий и сразу создаёт Initial commit.
Локальный сервер
Для запуска сервера достаточно в корне приложения запустить команду
$ symfony serve
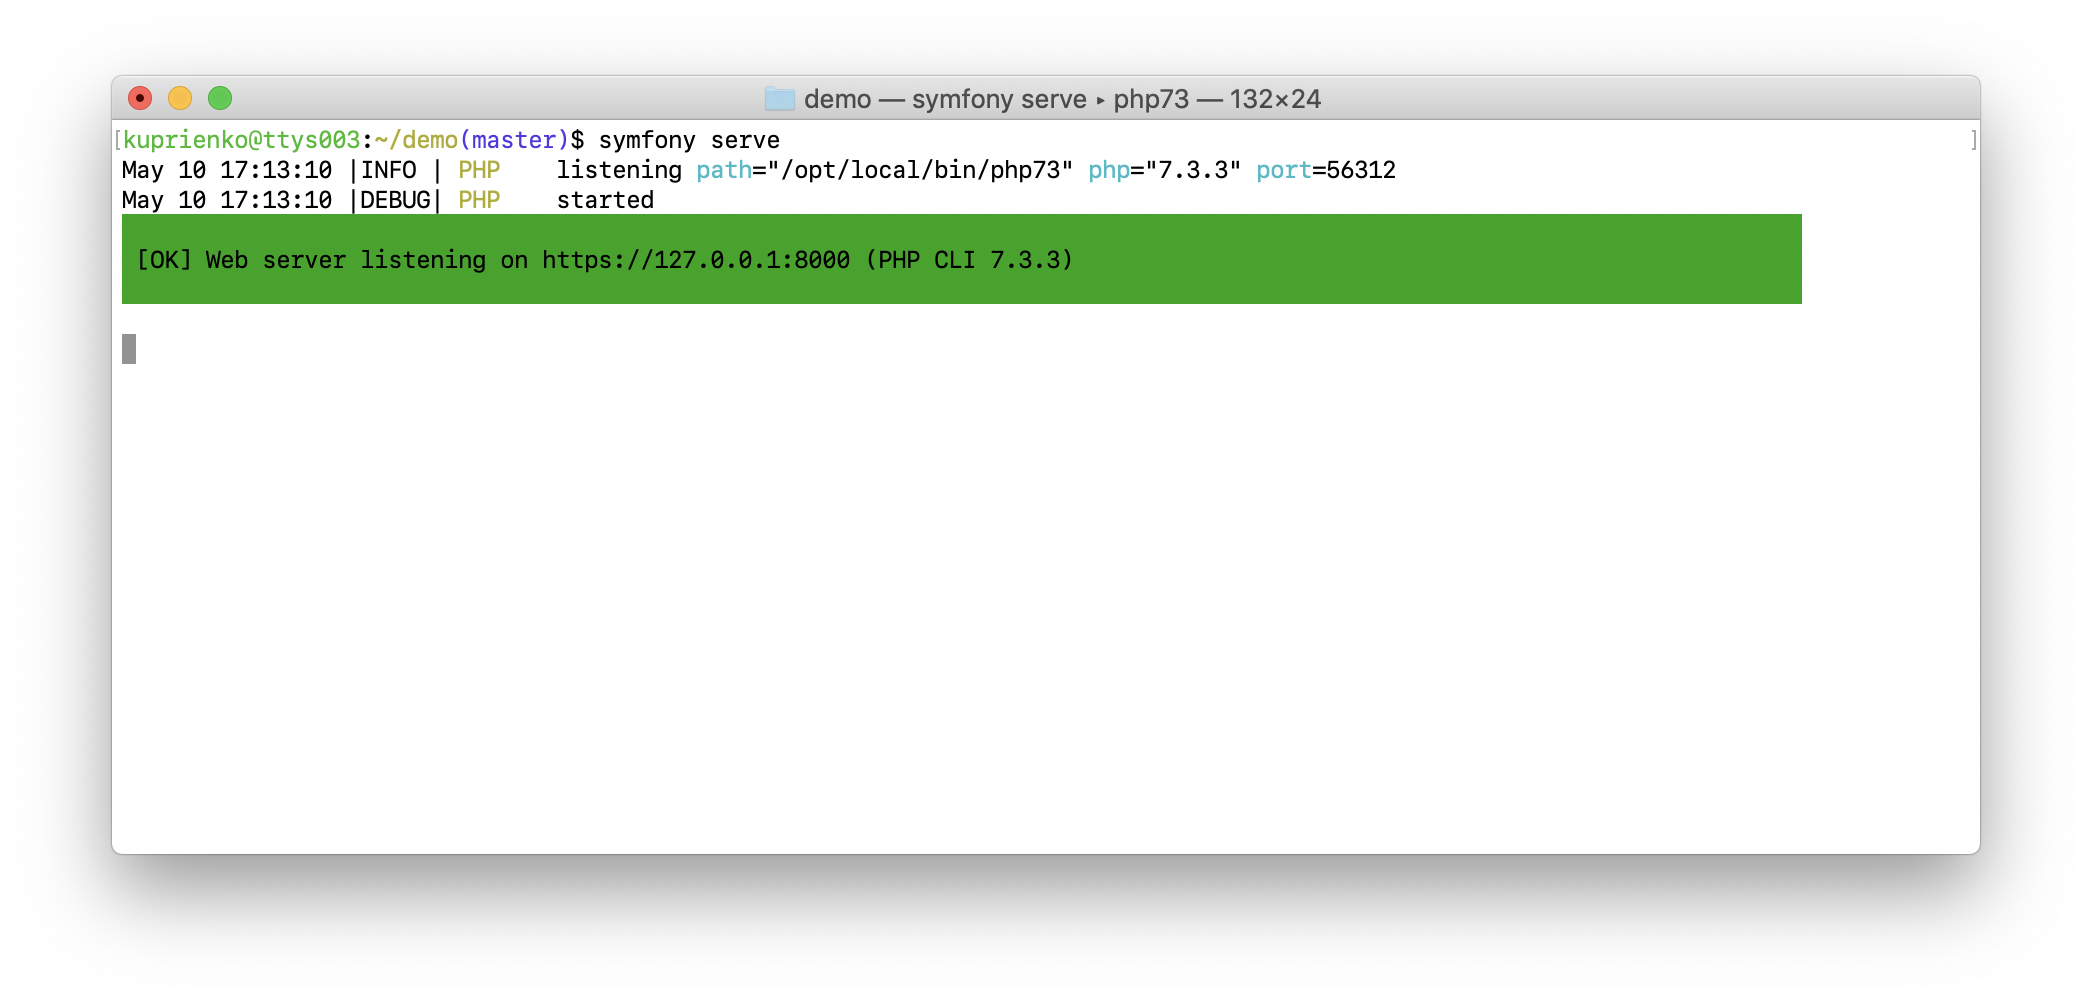
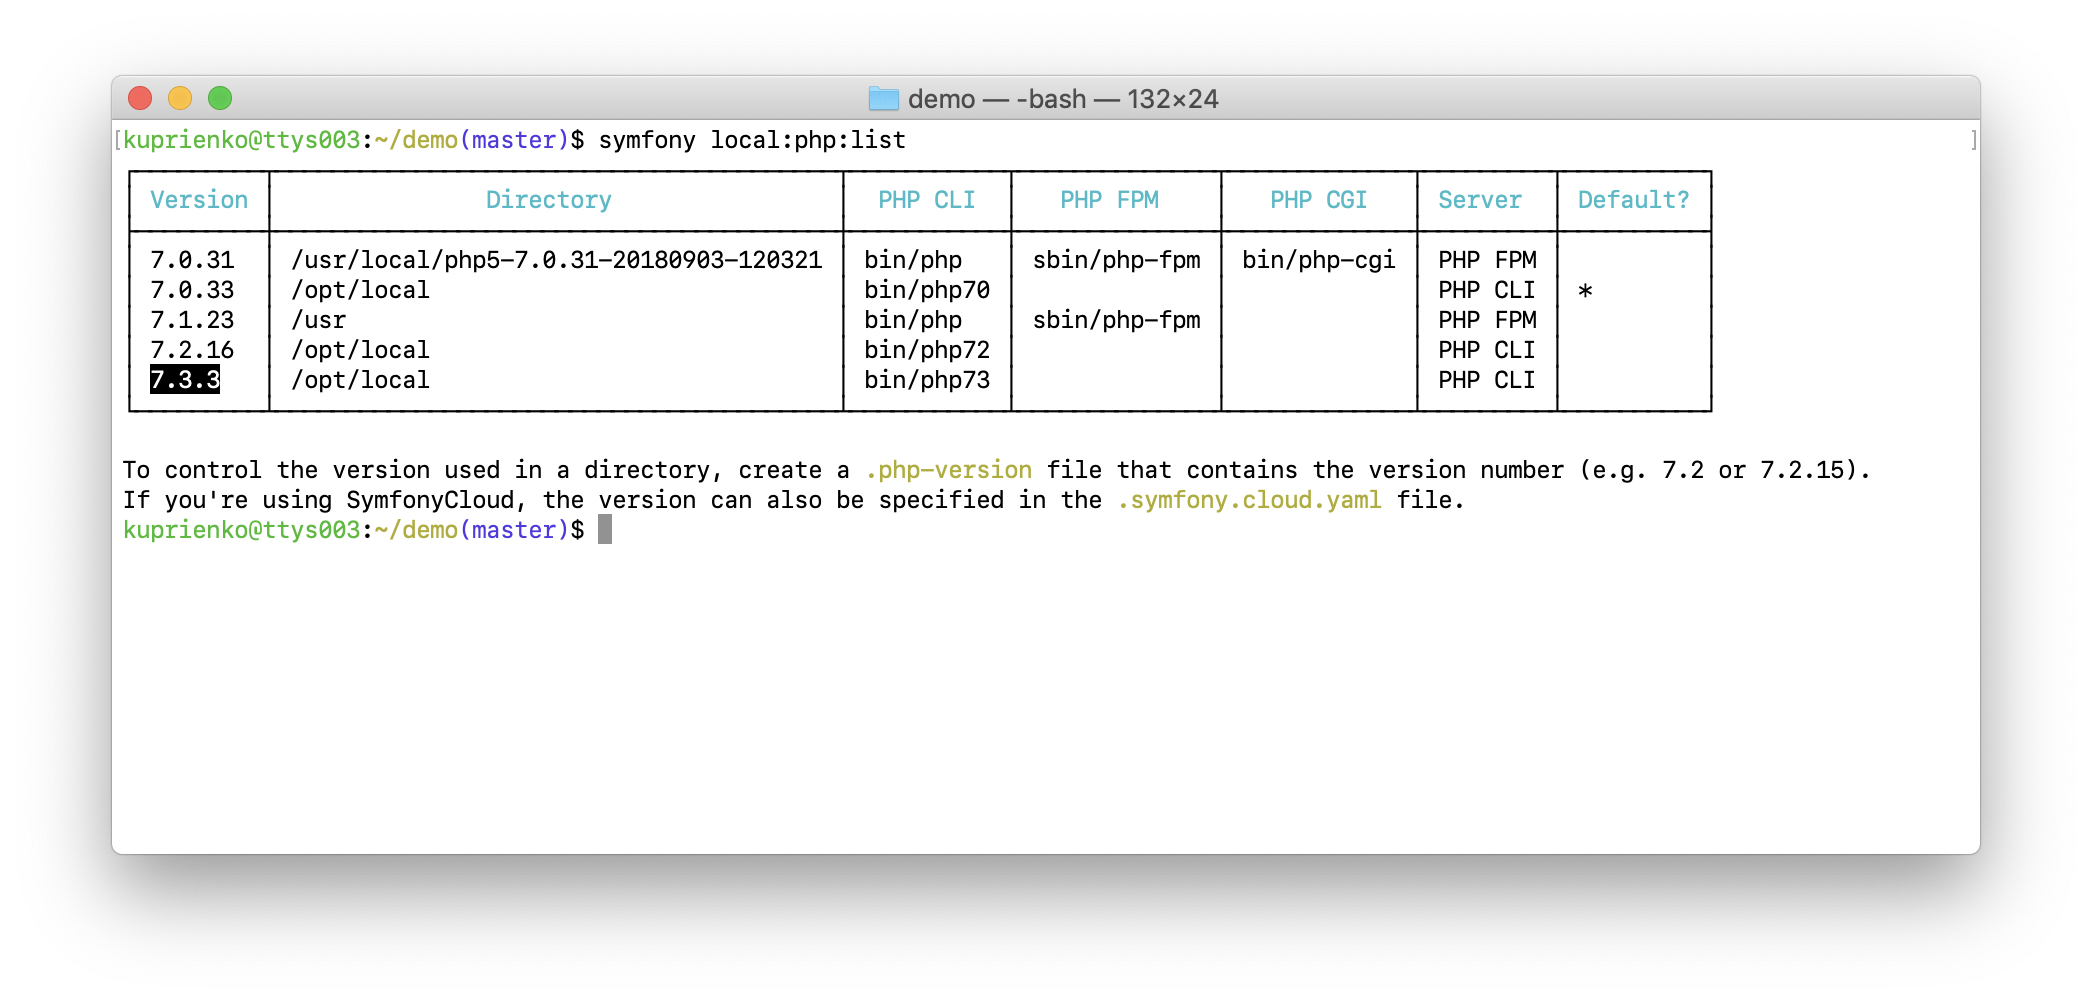
она проанализирует доступные SAPI на используемой машине и выберет лучший вариант из существующих, пользуясь следующими приоритетами: на первом месте PHP FPM, дальше PHP CGI и в конце PHP CLI. Список доступных SAPI можно посмотреть командой:
$ symfony local:php:list
После этого команда запустит сервер, который будет доступен по адресу 127.0.0.1 и подберёт свободный порт начиная с 8000.
По умолчанию сервер запускается в интерактивном режиме. Мы сразу видим логи сервера и приложения, но наш терминал заблокирован. Сервер можно запустить в режиме демона. Для этого нужно добавить опцию -d при запуске команды symfony serve.
Логи можно будет посмотреть, запустив команду:
$ symfony server:log
также можно посмотреть статус запущеного сервера используя команду:
$ symfony server:status
чтобы остановить запущенный сервер используется команда:
$ symfony server:stop
UPD: Раньше для запуска сервера мы использовали пакет symfony/web-server-bundle. С появлением Symfony CLI этот пакет становится не очень актуальным, так как он умеет только запускать сервер, используя PHP CLI SAPI и не поддерживает HTTPS, доменные имена, PHP FPM SAPI и прочее.
Поддержка TLS
Некоторые сторонние сервисы или библиотеки требуют отправлять запросы, используя HTTPS протокол. Symfony CLI предоставляет возможность очень легко настроить поддержку TLS, установив дополнительные компоненты, с помощью следующей команды:
$ symfony server:ca:install
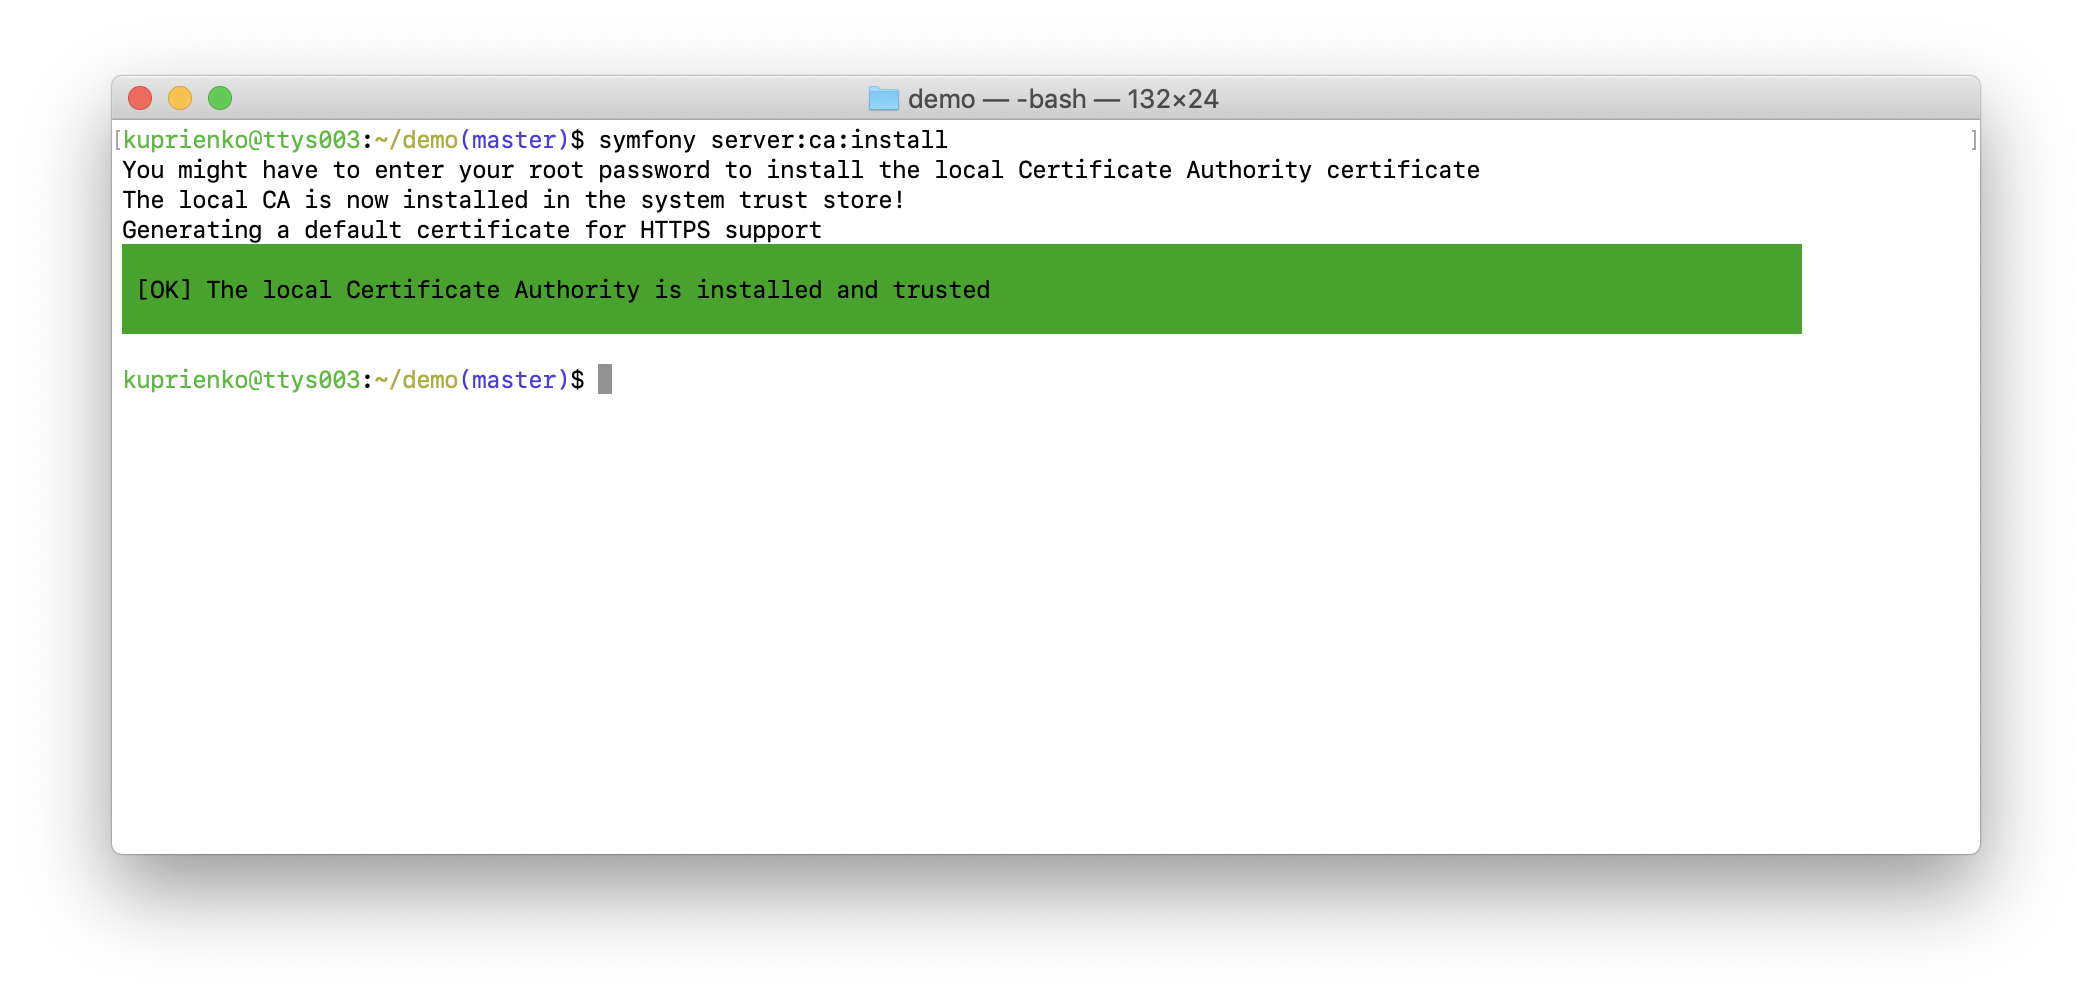
после чего достаточно перезапустить ваш браузер и вуаля — поддержка TLS настроена! Запускаете сервер командой symfony serve и можно перейти на сайт по HTTPS протоколу.
Мне не совсем нравится открывать все проекты по адресу https://127.0.0.1:8000 или https://localhost:8000, а вам? Это приносит свои неудобства: если запущено несколько проектов одновременно — нужно запоминать на каком порту какой проект работает; при перезапуске сервера порты могут меняться и т.п.
Symfony CLI решает и этот вопрос! Он предоставляет для нас proxy-сервер, с помощью которого можно создавать красивые доменные имена. Для этого нужно привязать к нашему проекту желаемое домменое имя с помощью команды:
$ symfony proxy:domain:attach <domain-name>
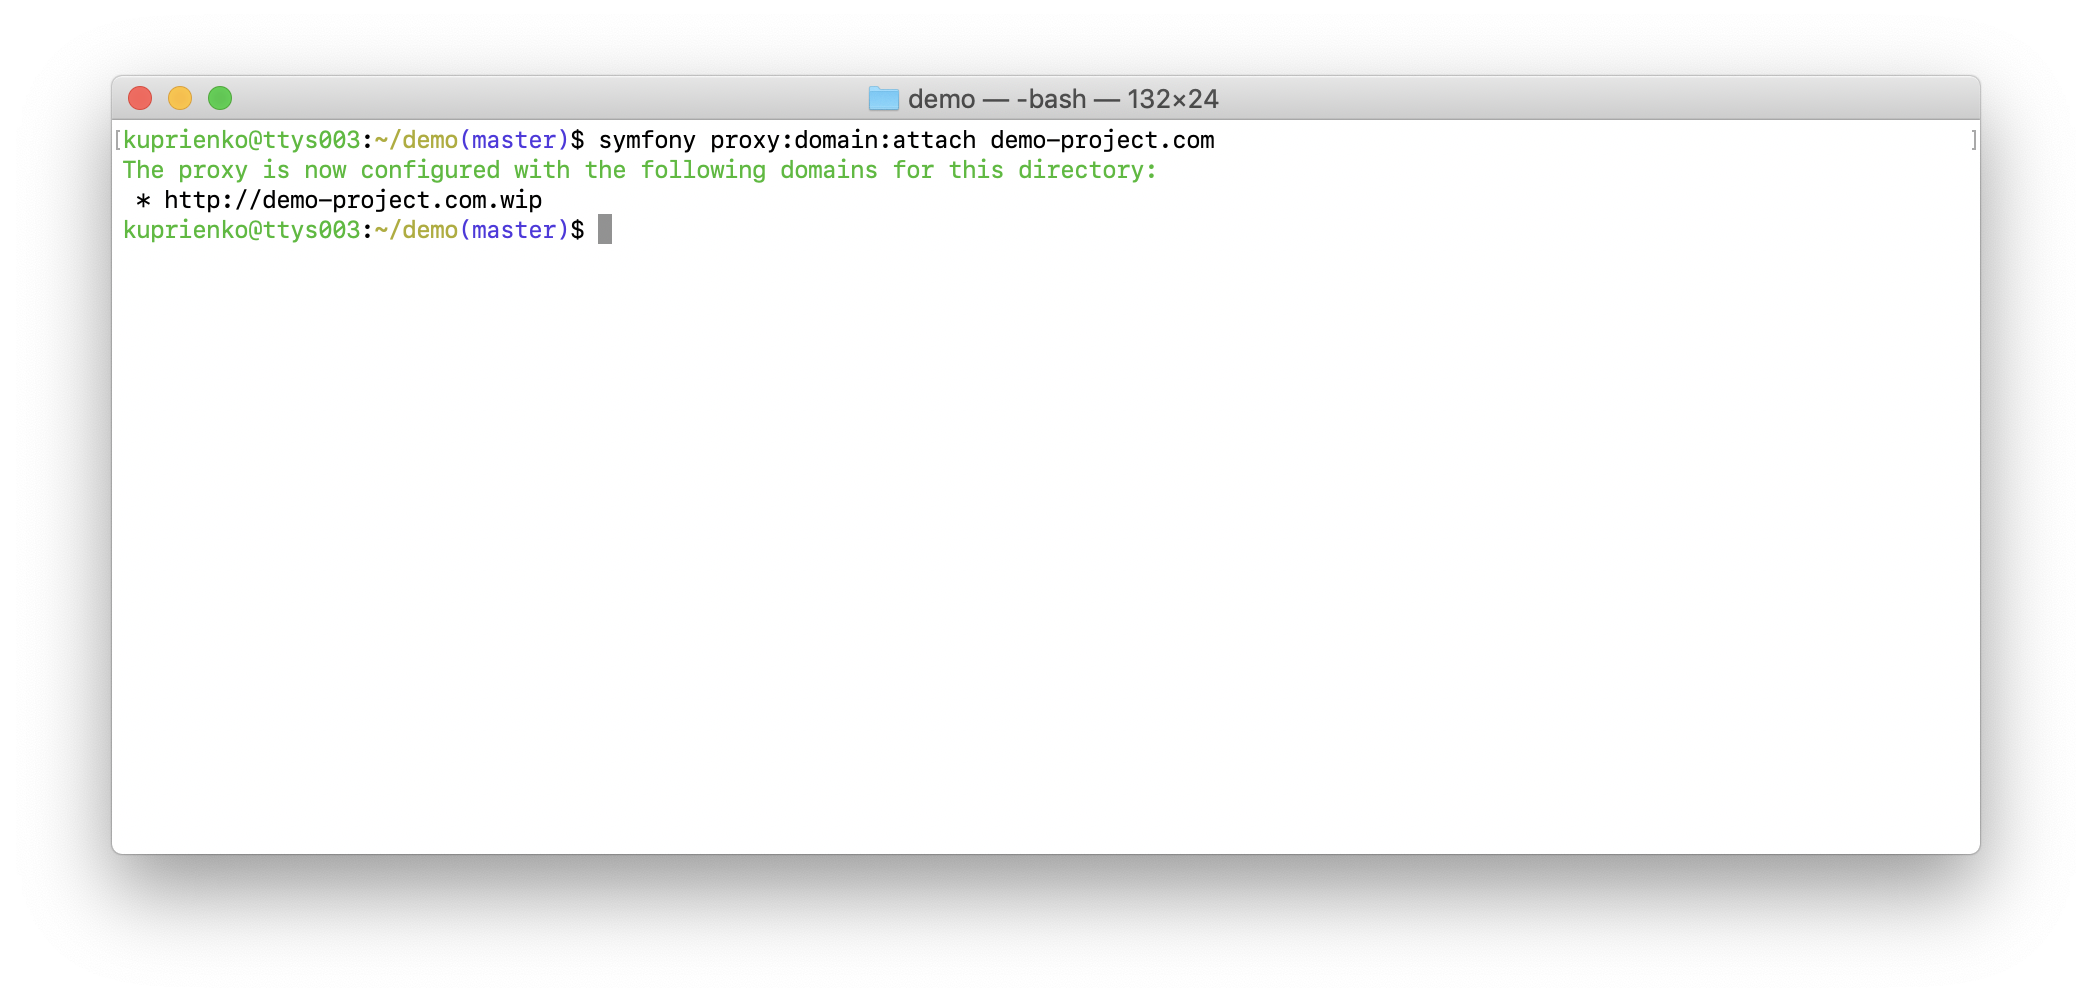
таким образом домен demo-project.com привязался к директории с проектом. Далее нам нужно запустить proxy-сервер командой:
$ symfony proxy:start
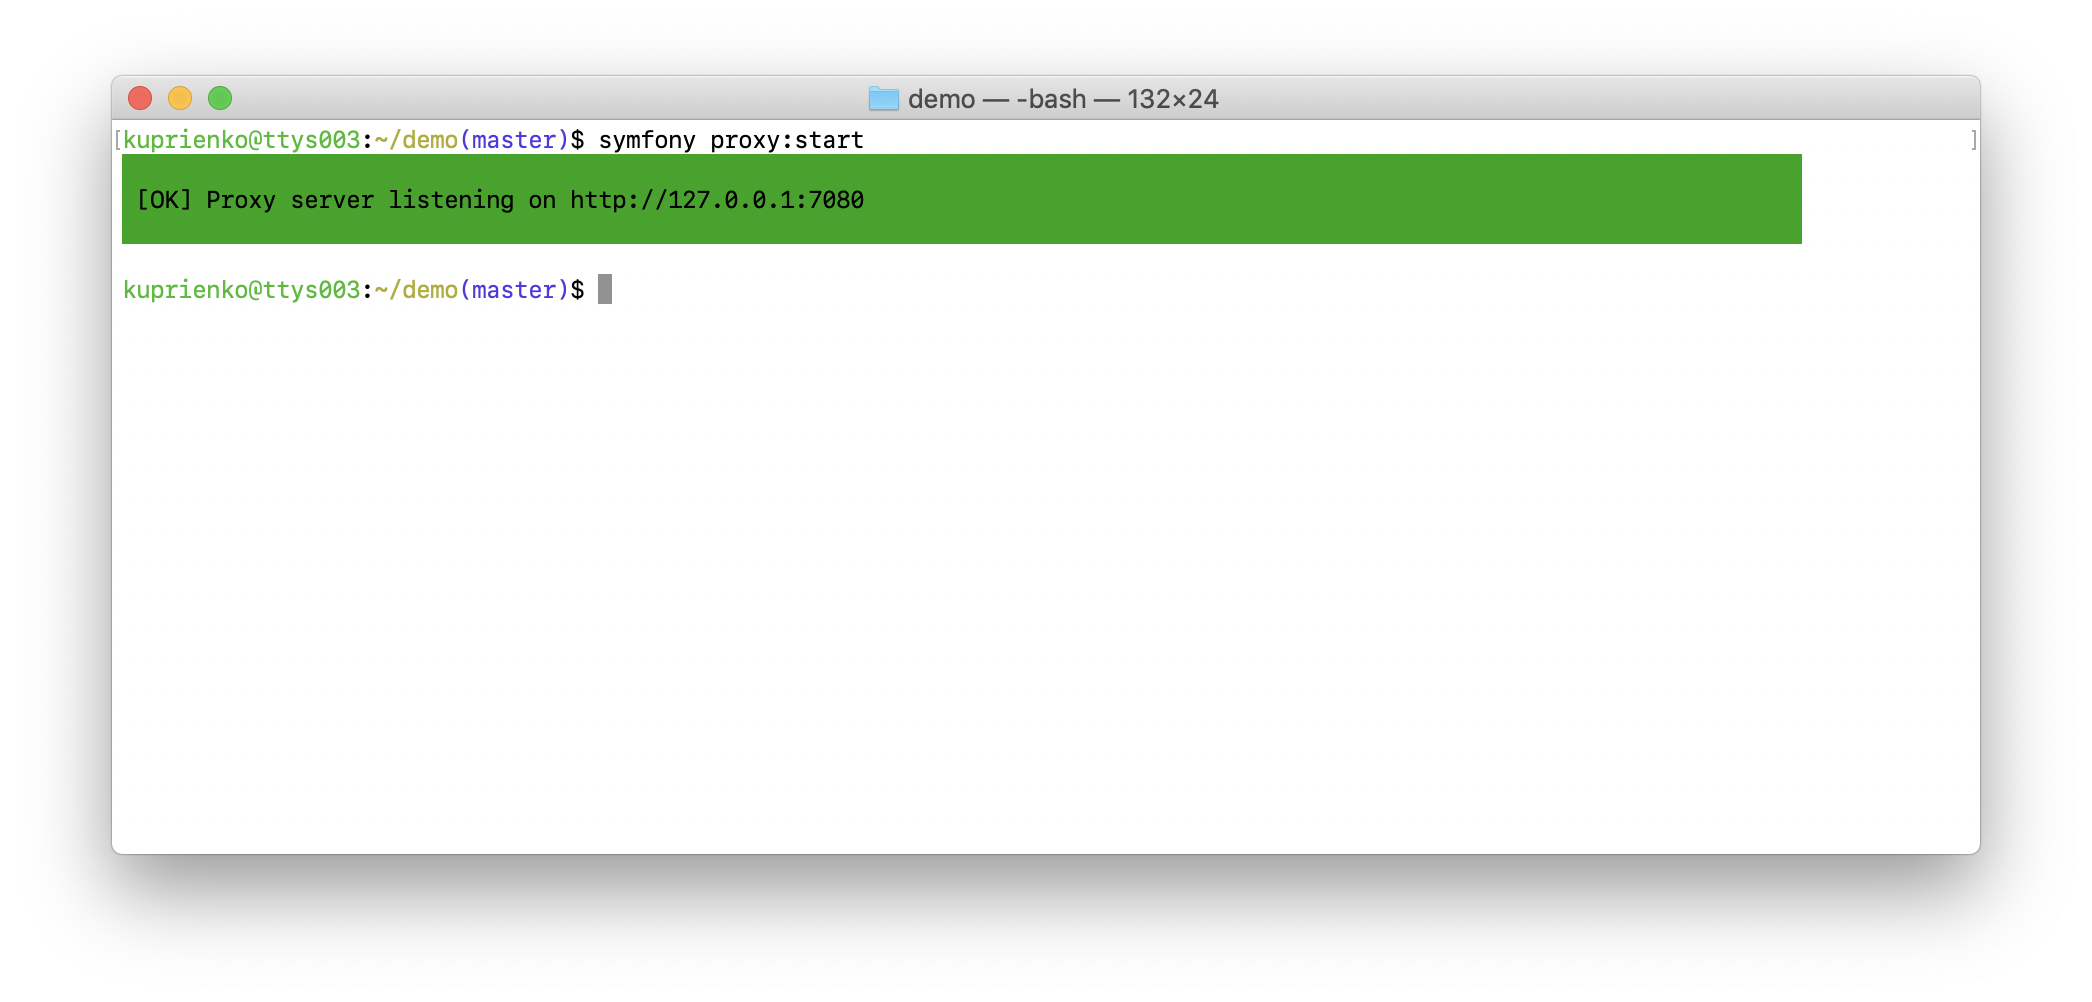
Мы запустили proxy-сервер в режиме демона и он доступен у нас по адресу http://127.0.0.1:7080, можем открыть его в браузере:
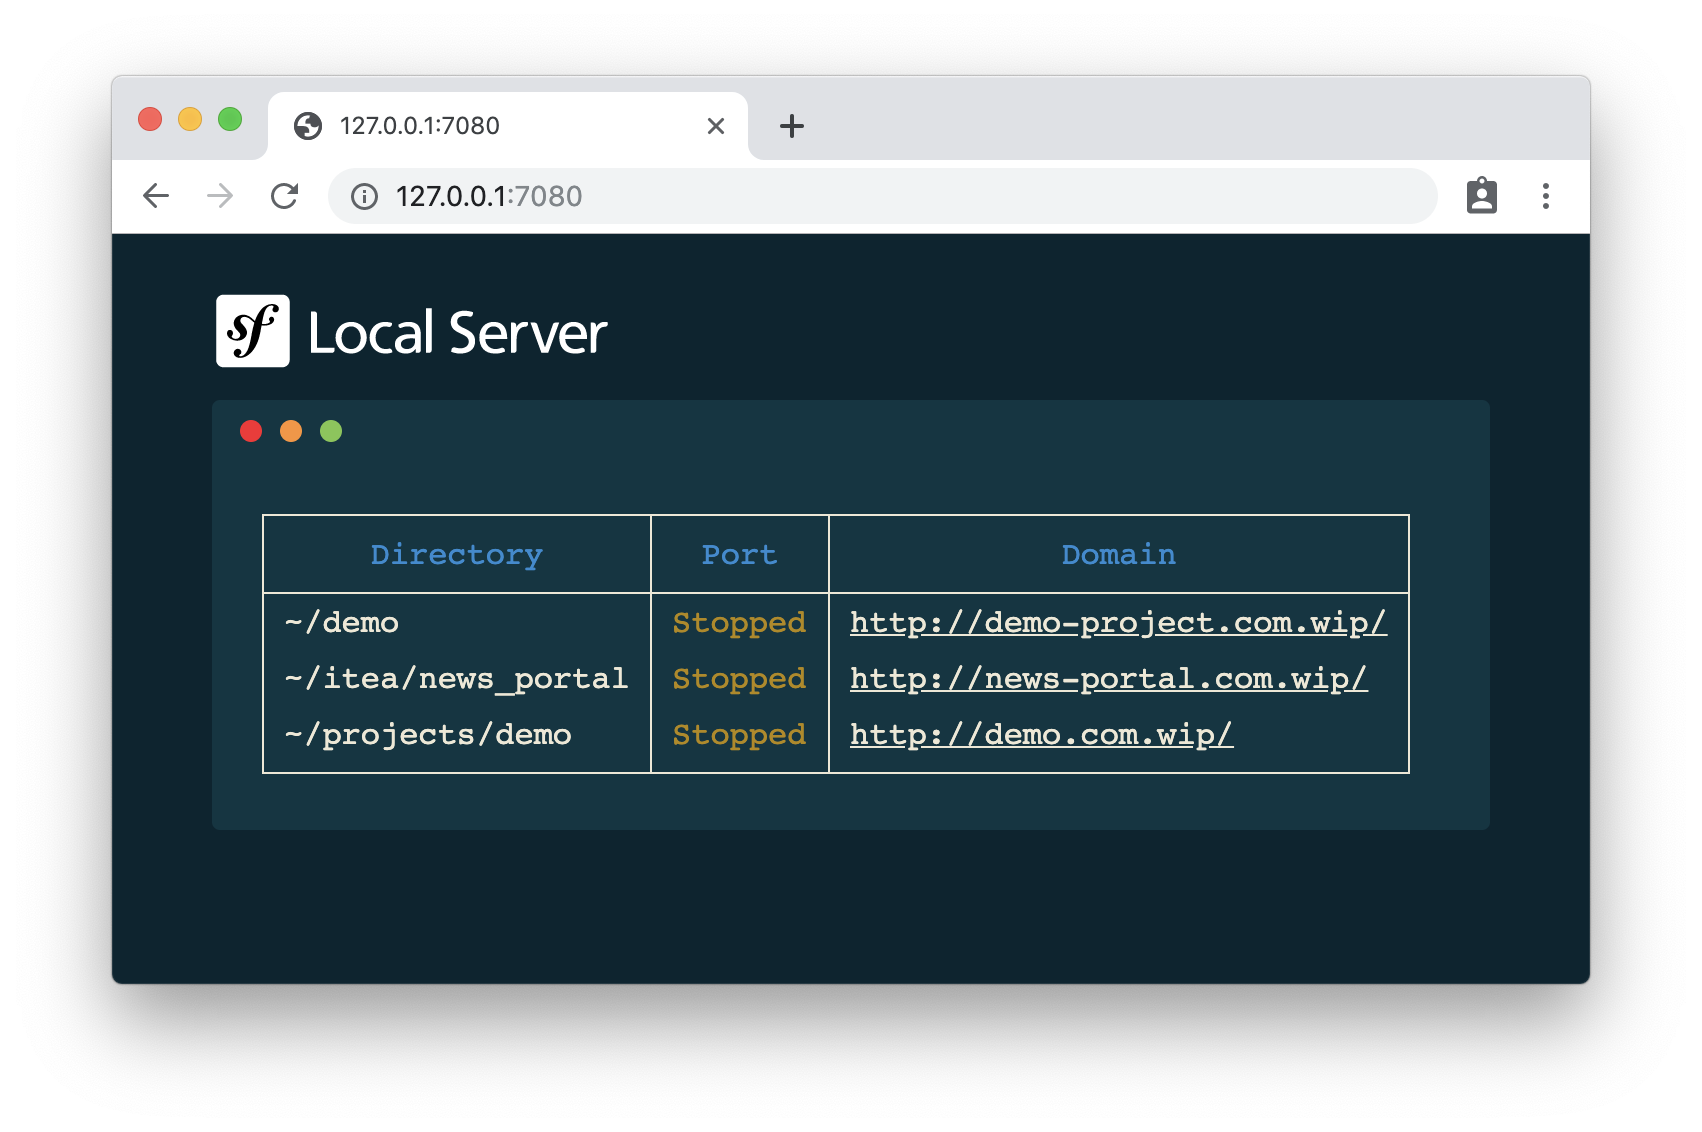
где увидим список доменов, пути к проектам в файловой системе и статус сервера для каждого проекта. На данном скриншоте видно то, что все сервера находятся в статусе Stopped, то есть они пока не запущены. Следующим шагом нам нужно добавить этот proxy-сервер в настройки ОС
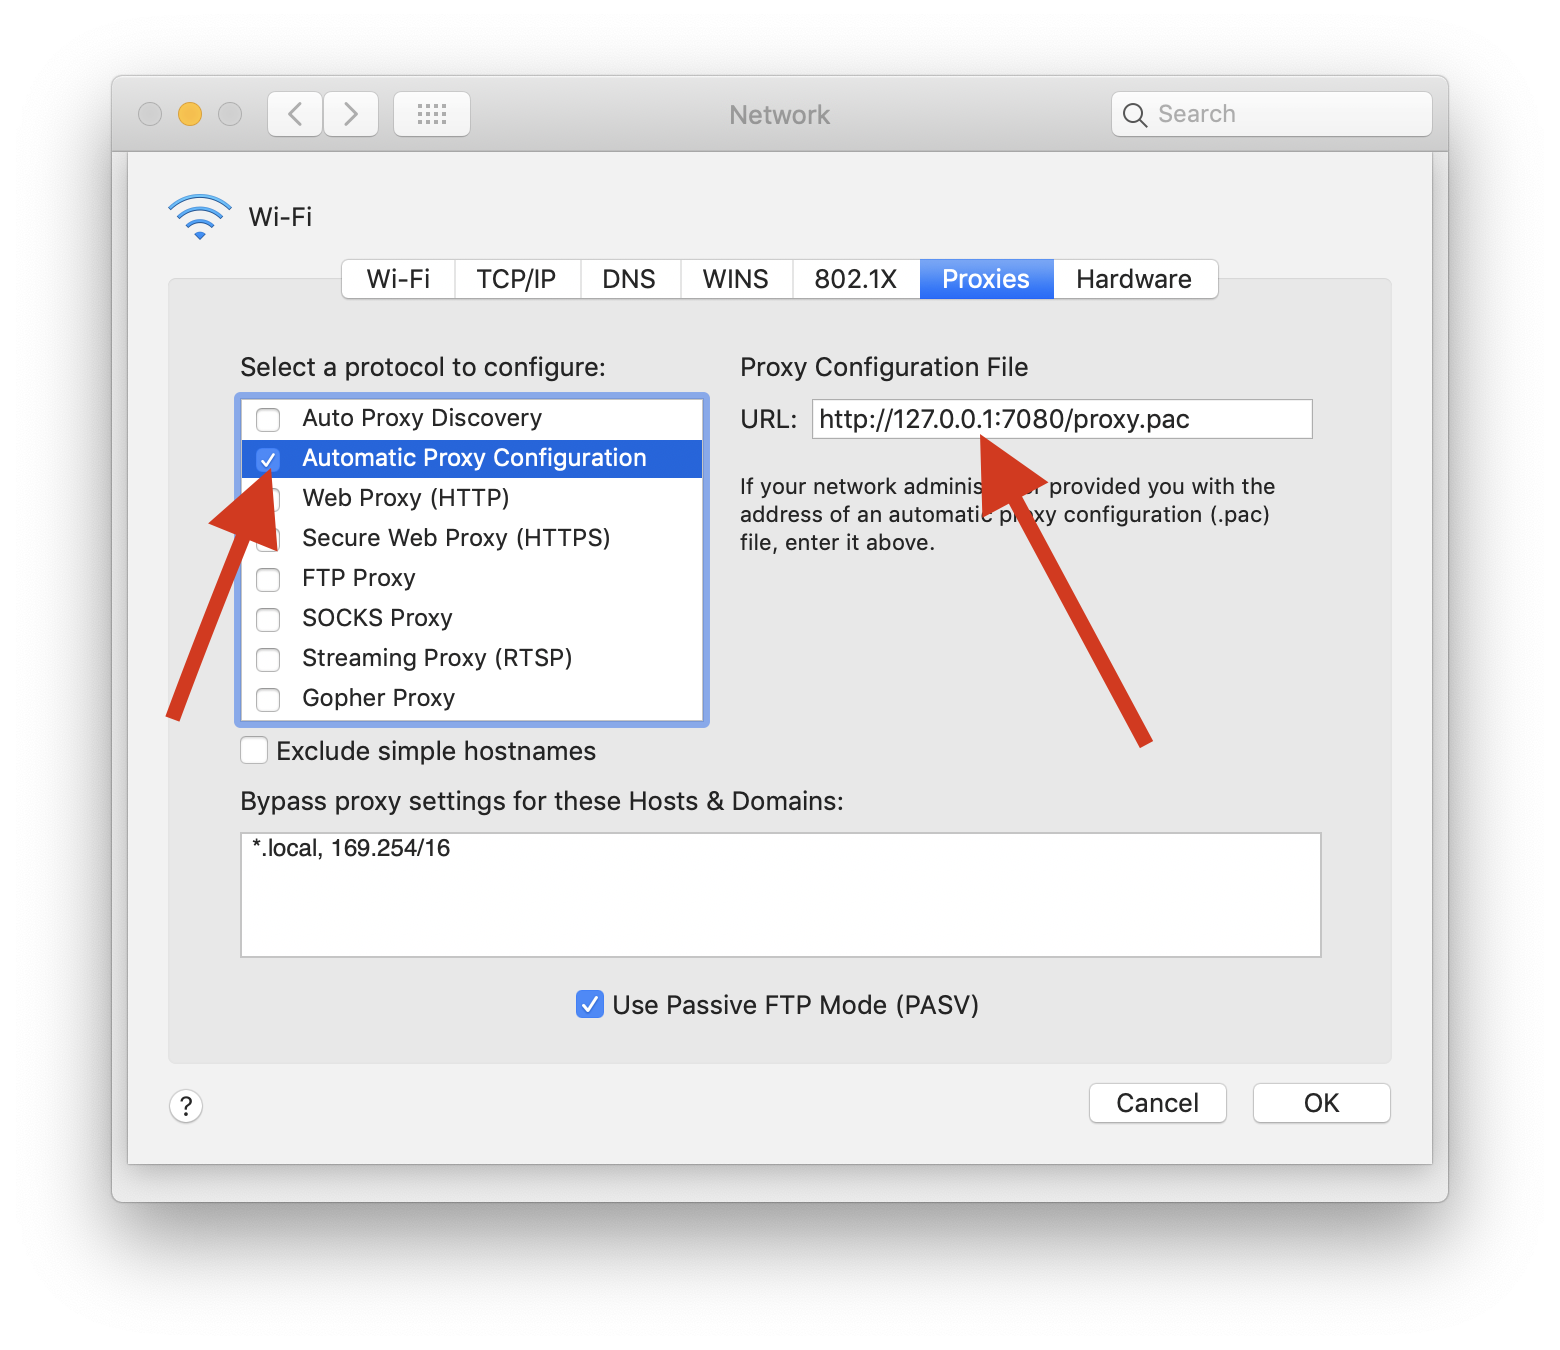
На этом настройка proxy-сервера заканчивается, далее нужно запустить сервер уже известной нам командой symfony serve. Помимо IP-адреса с портом мы увидим наше доменное имя, по которому можем перейти в браузере! Ко всем доменным именам добавляется постфикс .wip.

То есть в случае использования proxy-сервера flow запуска проекта немного меняется:
- Запускаем proxy-сервер
$ symfony proxy:start - Запускаем сервер для приложения
$ symfony serve
Для завершения работы с проектом “зеркалируем” действия, описанные выше:
- Останавливаем сервер
$ symfony server:stop - Останавливаем proxy-сервер
$ symfony proxy:stop
Для упрощения данных операций рекоммендую использовать утилиту GNU Make.
Переключение версий PHP
Если вы используете разные версии PHP на разных проектах, вы наверняка сталкивались с проблемой переключения между версиями. Было бы здорово иметь какой-то автоматический инструмент для этого, не так ли? Symfony CLI умеет решать и эту проблему! Вам достаточно создать файл .php-version в корне проекта и в качестве содержимого указать желаемую версию.
$ echo "7.2" > .php-version
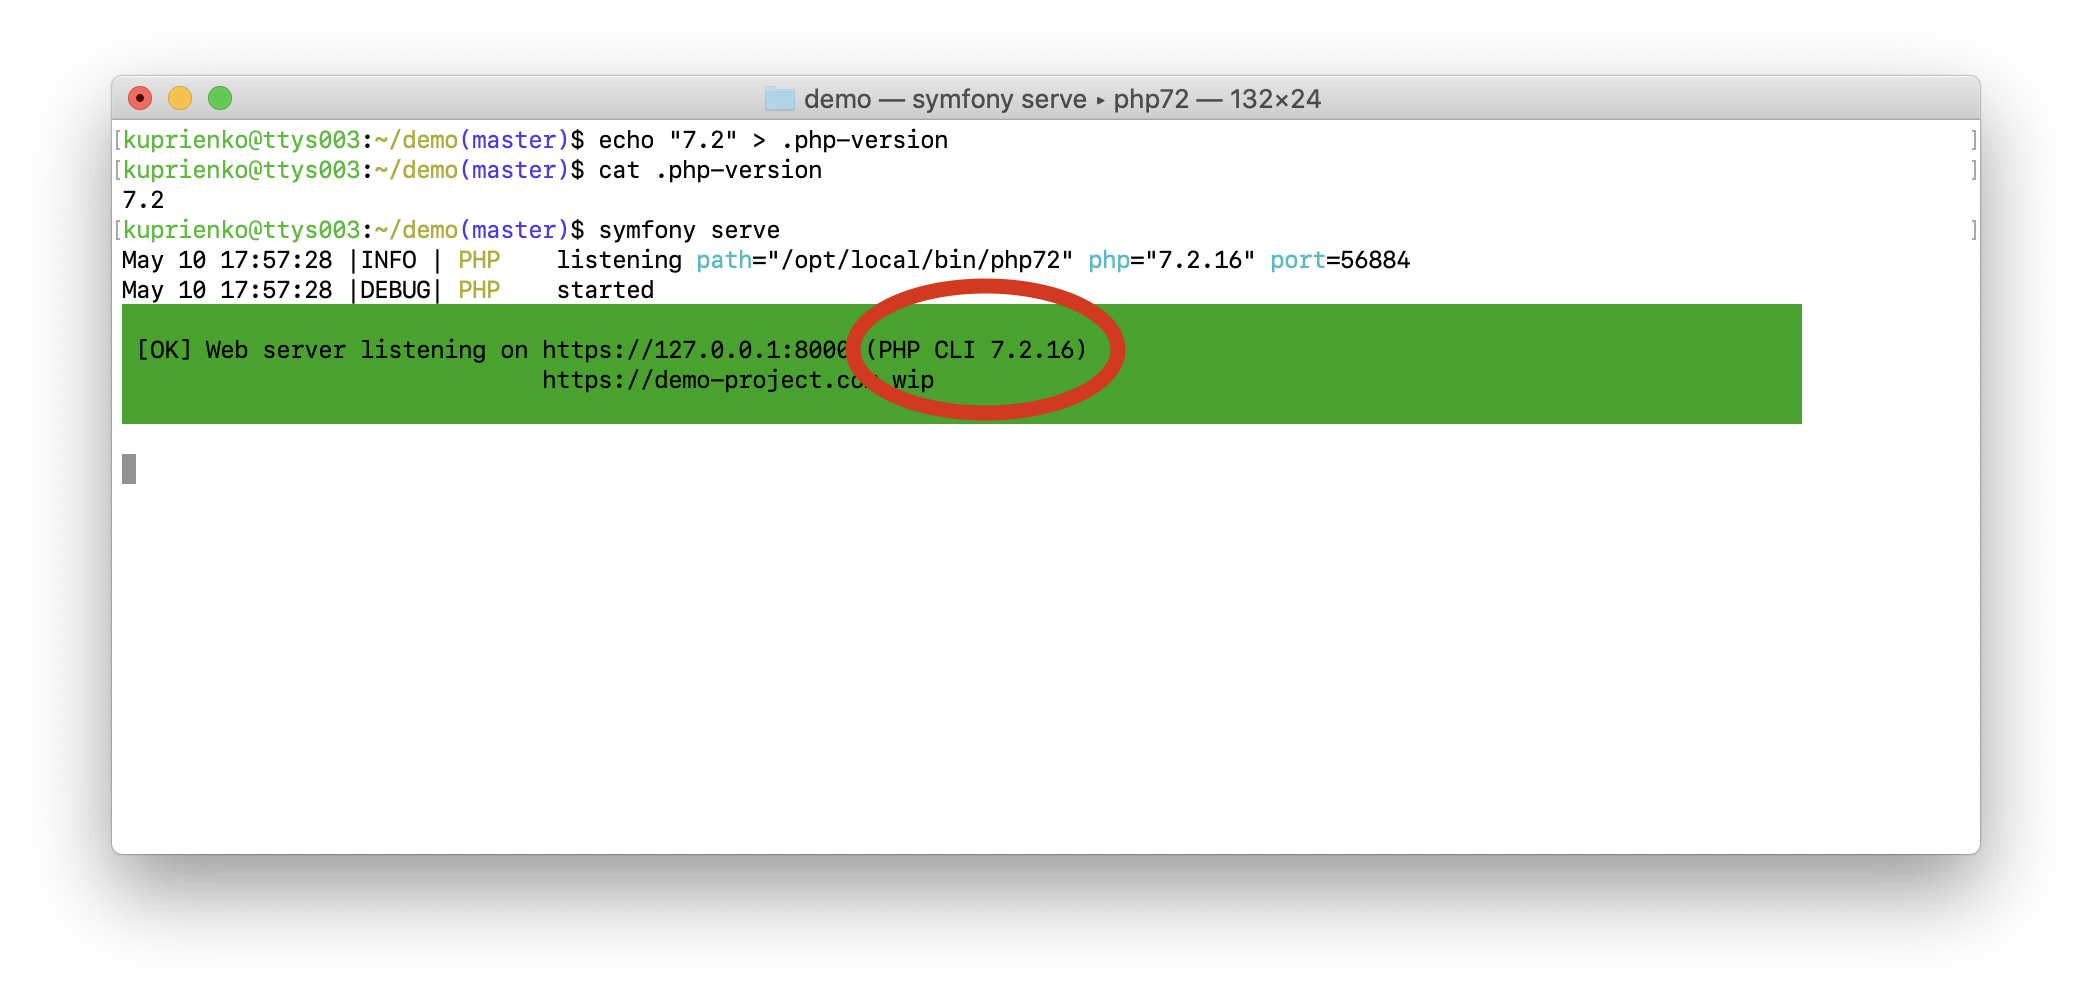
Как видно на скриншоте выше, Symfony CLI прочитал файл .php-version и запустил сервер, используя версию, указанную в этом файле.
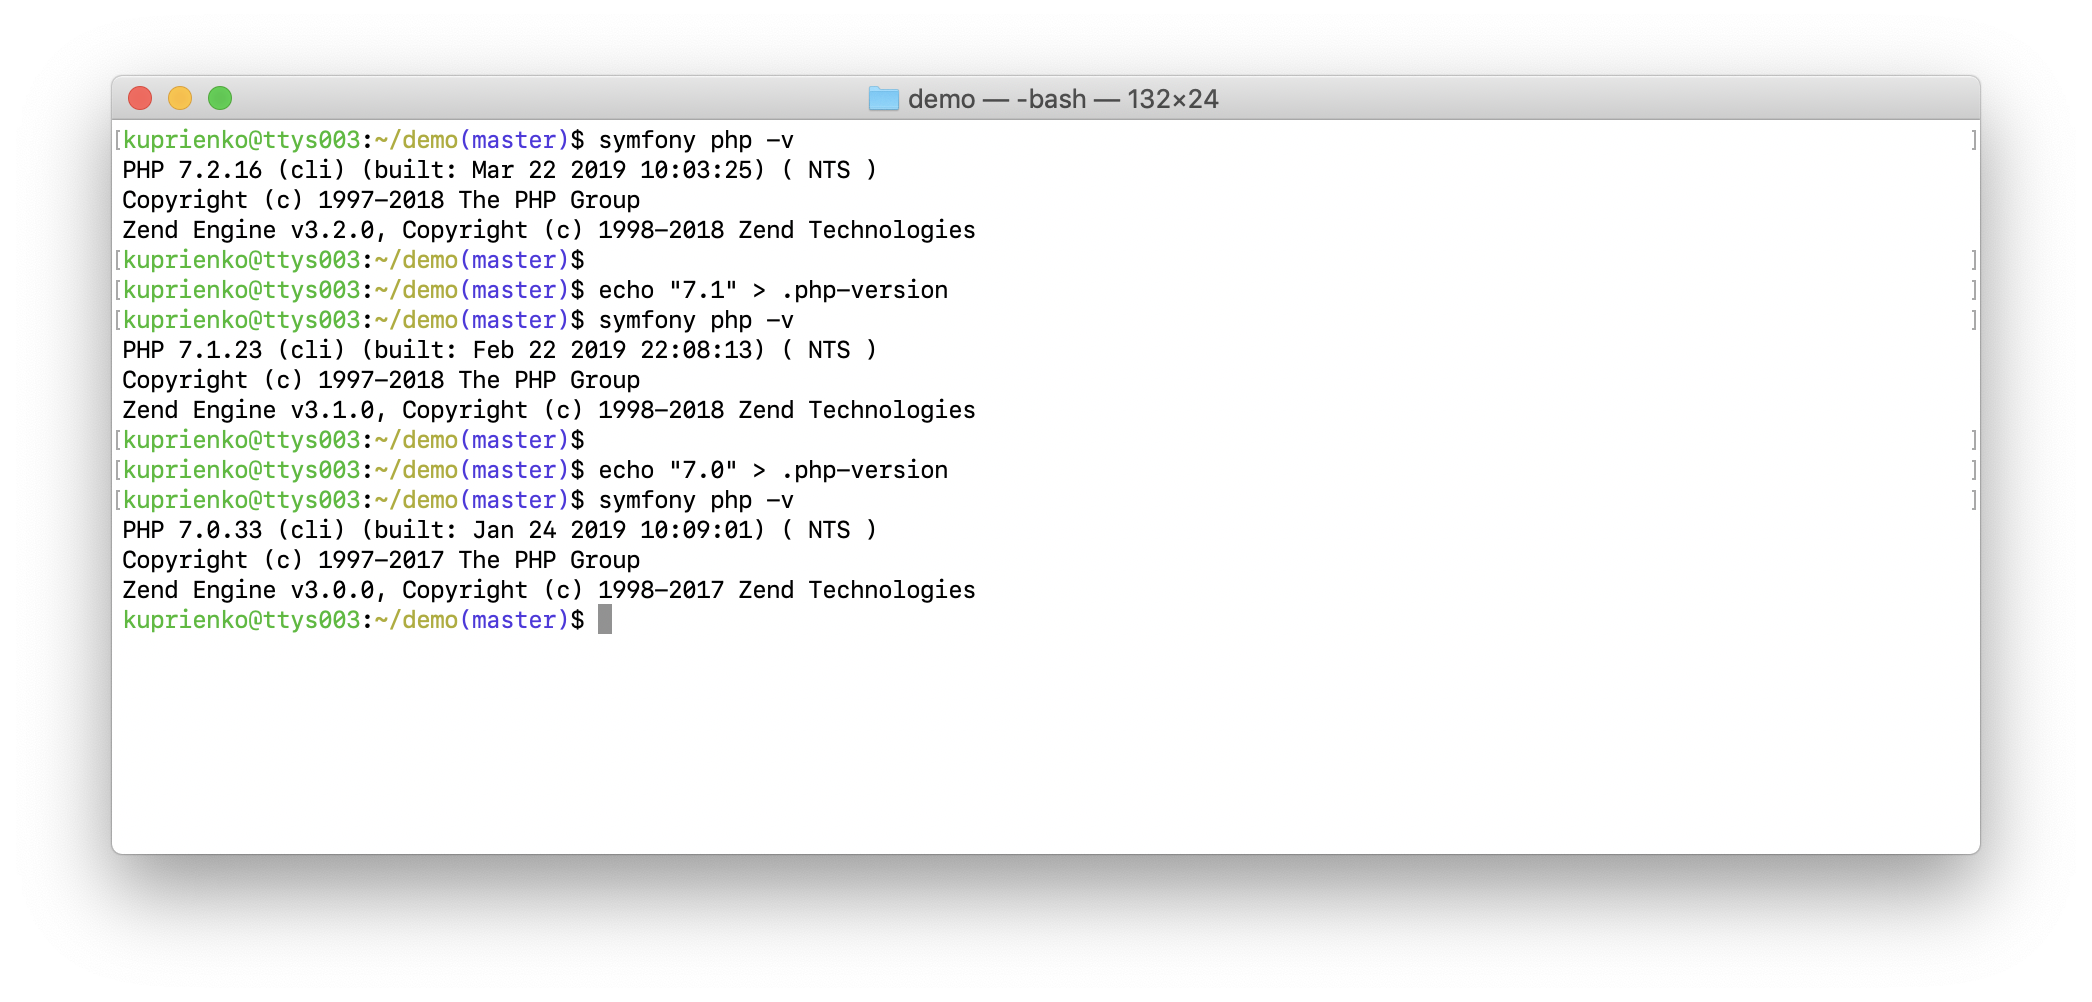
Так же Symfony CLI предоставляет нам обёртку над PHP CLI, которая тоже учитывает версию PHP, указанную в файле .php-version. То есть если вам нужно вызывать консольные скрипты, например bin/console — используйте её.
$ symfony php
Для удобства можно создать алиас для этой команды, чтобы сэкономить время и избежать ошибок в написании команды. К примеру, я создал для себя алиас sphp:
$ echo "alias sphp='symfony php'" >> ~/.bash_profile && source ~/.bash_profile
Symfony CLI предоставляет аналогичную обёртку для Composer, поэтому с ним у вас также не возникнет никаких проблем. Для удобства можно создать алиас и для этой обёртки. У меня это scomposer:
$ echo "alias scomposer='symfony composer'" >> ~/.bash_profile && source ~/.bash_profile
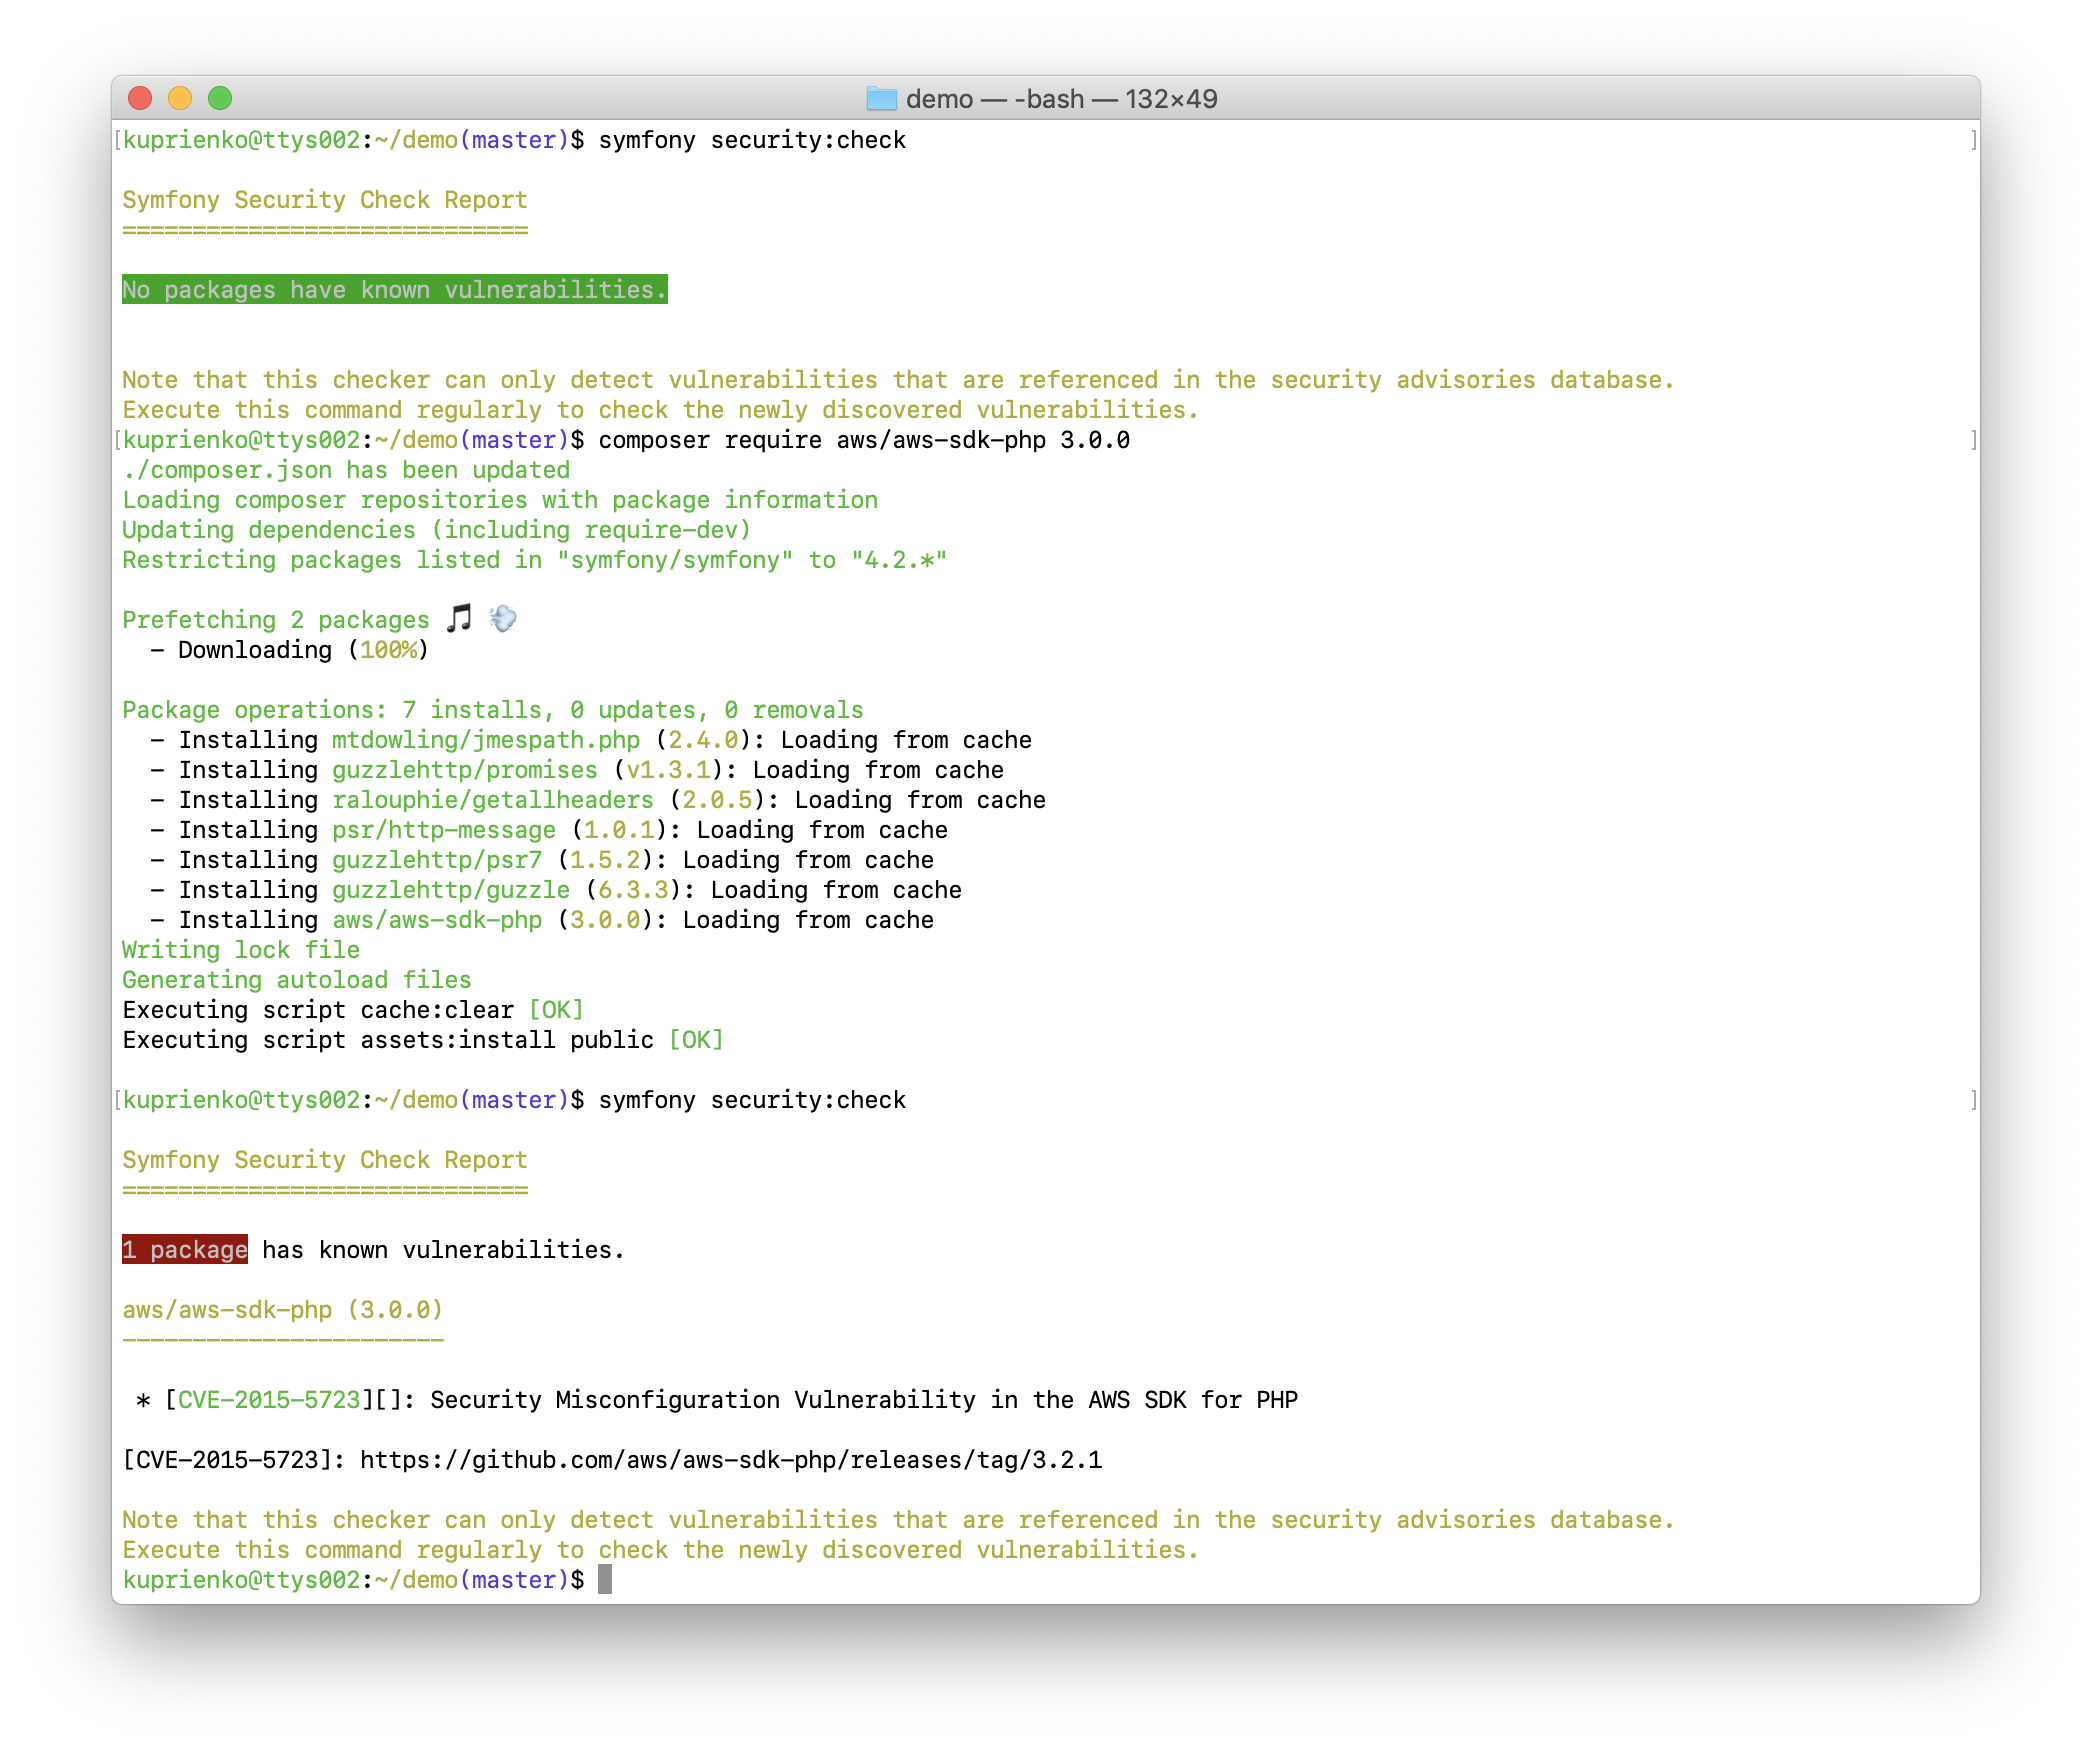
Проверка на уязвимые пакеты
В качестве бонуса Symfony CLI предоставляет команду для проверки на наличие уязвимых composer-пакетов в вашем проекте. Больше не прийдётся устанавливать в проект зависимость Symfony Security Checker. Так же официальная документация говорит о том, что версия встроенная в Symfony CLI работает оптимальнее за счёт того, что она не делает HTTP запросы на официальный API. Запустить проверку можно командой:
$ symfony security:check
Install Laravel on Ubuntu
System requirements
Your system must meet the following requirements to be able to run the latest version of Laravel:
PHP> = 7.1.3 with OpenSSL, PDO, Mbstring, Tokenizer, XML, Ctype and JSON PHP Extensions.
Composer is an application-level package manager for PHP.
Setting prerequisites
First, make sure you update your system sources and existing software packages using the following commands.
$ sudo apt-get update
$ sudo apt-get upgrade
Installing LAMP Stack on Ubuntu
Then set up a running LAMP environment (Linux, Apache, MySQL and PHP), if you already have it, you can skip this step or install the LAMP stack using the following commands on your Ubuntu system.
$ sudo apt-get install python-software-properties
$ sudo add-apt-repository ppa: ondrej / php
$ sudo apt-get update
$ sudo apt-get install apache2 libapache2-mod-php7.2 mysql-server php7.2 php7.2-xml php7.2-gd php7.2-opcache php7.2-mbstring php7.2-mysql
Although the Ubuntu repository has PHP by default, it is always recommended to have a third party repository for more frequent updates.
If you want, you can skip this step and stick with the standard PHP version from the Ubuntu repository.
Installing Composer on Ubuntu
Now we need to install Composer (dependency manager for PHP) to install the required Laravel dependencies using the following commands.
# curl -sS https://getcomposer.org/installer | php
# mv composer.phar / usr / local / bin / composer
# chmod + x / usr / local / bin / composer
Installing Laravel on Ubuntu
After installing Composer, you can now download and install the latest Laravel from the official git repository in the Apache / var / www directory.
$ cd / var / www
$ git clone https://github.com/laravel/laravel.git
$ cd / var / www / laravel
$ sudo composer install
After the Laravel installation is complete, set the appropriate permissions for all files using the following commands.
$ chown -R www-data.www-data / var / www / laravel
$ chmod -R 755 / var / www / laravel
$ chmod -R 777 / var / www / laravel / storage
Setting up an encryption key
Now create an environment file for your application using the provided sample file.
$ cp .env.example .env
Laravel uses the application key to secure user sessions and other encrypted data.
Therefore, you need to generate and set your application key to a random string using the following command.
$ php artisan key: generate
After the key has been generated, open the .env configuration file and update the required values.
Also, make sure APP_KEY is set correctly in the config file generated in the above command.
APP_NAME = Laravel
APP_ENV = local
APP_KEY = base64: AFcS6c5rhDl + FeLu5kf2LJKuxGbb6RQ / 5gfGTYpoAk =
APP_DEBUG = true
APP_URL = http: // localhost
Create database for Laravel
You may also need to create a MySQL database for your Laravel application project using the following commands.
$ mysql -u root -p
mysql> CREATE DATABASE laravel;
mysql> GRANT ALL ON laravel. * to ‘laravel’ @ ‘localhost’ IDENTIFIED BY ‘secret_password’;
mysql> FLUSH PRIVILEGES;
mysql> quit
Now open your .env config file and update your database settings as shown below:
DB_CONNECTION = mysql
DB_HOST = 127.0.0.1
DB_PORT = 3306
DB_DATABASE = laravel
DB_USERNAME = laravel
DB_PASSWORD = secret_password
Configuring Apache for Laravel
Now go to the default virtual host config file in Apache /etc/apache2/sites-enabled/000-default.conf and update the DocumentRoot public directory in Laravel as shown below:
$ nano /etc/apache2/sites-enabled/000-default.conf
Now change the default virtual host configuration with the following content and also be sure to replace yourdomain.tld with your website’s domain name as shown below:
<VirtualHost *: 80>
ServerName yourdomain.tld
ServerAdmin webmaster @ localhost
DocumentRoot / var / www / laravel / public
<Directory />
Options FollowSymLinks
AllowOverride None
</Directory>
<Directory / var / www / laravel>
AllowOverride All
</Directory>
ErrorLog $ {APACHE_LOG_DIR} /error.log
CustomLog $ {APACHE_LOG_DIR} /access.log combined
</VirtualHost>
After making the above changes, remember to reload the Apache configuration changes by restarting the service using the following command:
$ sudo service apache2 restart
Accessing Laravel Application
Finally, access your Laravel app from the browser using the following url.
http: //yourdomain.tld
or
http: // your-ip-address
Adobe Flash reaches end of life
Adobe’s once-ubiquitous Flash Player, a browser-based runtime for displaying rich media content on the Internet, has reached the end of the road, with the company having made the final scheduled release of the technology for all regions outside mainland China.
The final release was made on December 8. Adobe will no longer support Flash Player after this month; Flash content will be blocked from running in Flash Player beginning on January 12, 2021.
Adobe advises all users to immediately uninstall Flash Player to protect their systems. In release notes, Adobe thanked customers and developers who have used the technology and created content leveraging it during the last two decades. An end-of-life general information page has been posted.
Adobe announced in July 2017 that it would discontinue Flash Player at the end of this year. Flash technology succumbed to perceptions of it as proprietary technology in an era when standards-based technologies such as HTML5 began to gather momentum. Adobe cited WebGL and WebAssembly as now-viable alternatives.
Flash sustained a critical blow when Apple declined not to support it on the iPhone and iPad mobile devices. Additionally, security issues plagued Flash, and major browser vendors began moving away from the technology. Video content site YouTube backed away from Flash in 2015, opting for HTML5.
By giving three years’ advance notice, Adobe hoped to provide enough time for developers, designers, businesses, and others to migrate their Flash content to new standards. The timing of the Flash end-of-life was coordinated with major browser vendors.
Mozilla Firefox boosts JavaScript performance
Firefox users can expect improved JavaScript performance in the Firefox 83 browser, with the Warp update to the SpiderMonkey JavaScript engine enabled by default.
Also called WarpBuilder, Warp improves responsiveness and memory usage and speeds up page loads by making changes to JiT (just-in-time) compilers. Optimizing JiT is changed to rely solely on the CacheIR simple linear bytecode format, specifically, CacheIR data collected by the baseline tiers. The new architecture leveraged in the browser also is described as being more maintainable and unlocking additional SpiderMonkey improvements.
Firefox 83 was published in beta October 20 and is scheduled to be released November 17. Warp has been shown to be faster than Ion, SpiderMonkey’s previous optimizing JiT, including a 20 percent improvement on Google Docs load time. Other JavaScript-intensive websites such as Netflix and Reddit also have shown improvement.
Basing Warp on CacheIR enabled removal of code throughout the engine that was needed to track global type inference data used by IonBuilder, resulting in speedups. Although IonBuilder and WarpBuilder both produce Ion MIR, an intermediate representation used by the optimizing JiT back end, IonBuilder had a lot of complex code not needed in WarpBuilder. Warp also can do more work off-thread and needs fewer recompilations. Plans call for continued optimizations on Warp, which at present is slower than Ion on some synthetic benchmarks.
Warp has replaced the front end — the MIR building phase — of the IonMonkey JiT. Plans call for removing the old code and architecture, which is likely to happen in Firefox 85. Additional performance and memory usage improvements are anticipated as a result. Mozilla also will continue to incrementally optimize the back end of the IonMonkey JiT, as Mozilla believes there is still room for improvement for JavaScript-intensive workloads. Also in development is a tool for web developers and Mozilla to explore CacheIR data for a JavaScript function.
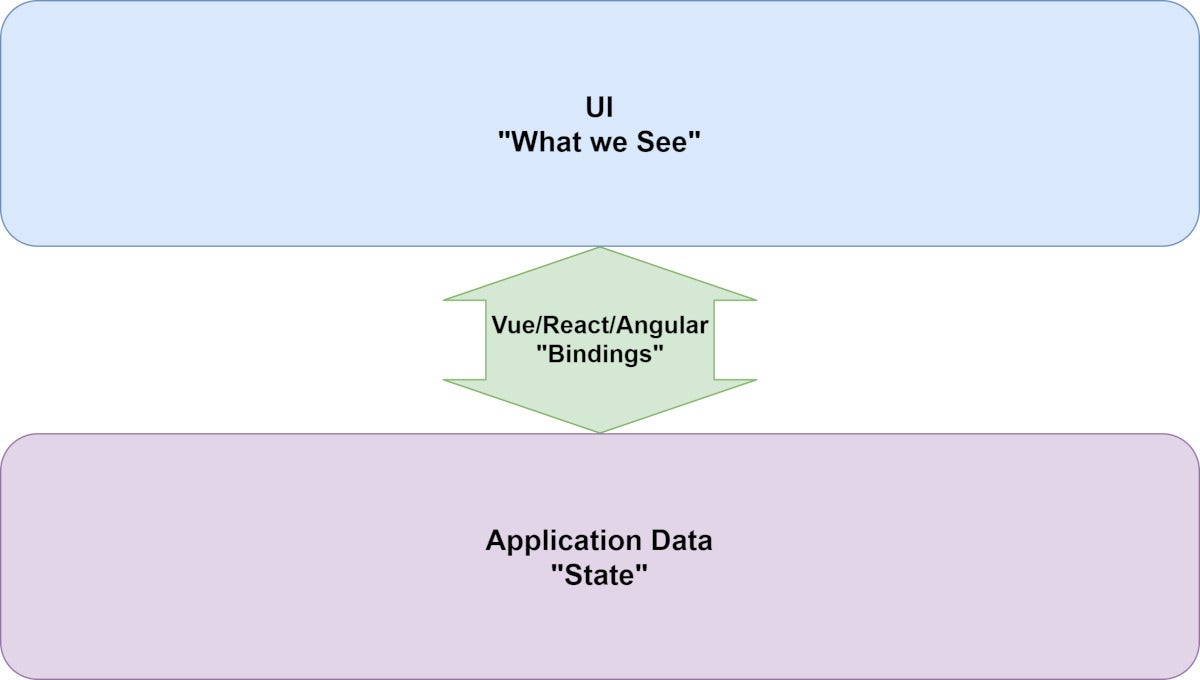
Angular, React, Vue: JavaScript frameworks
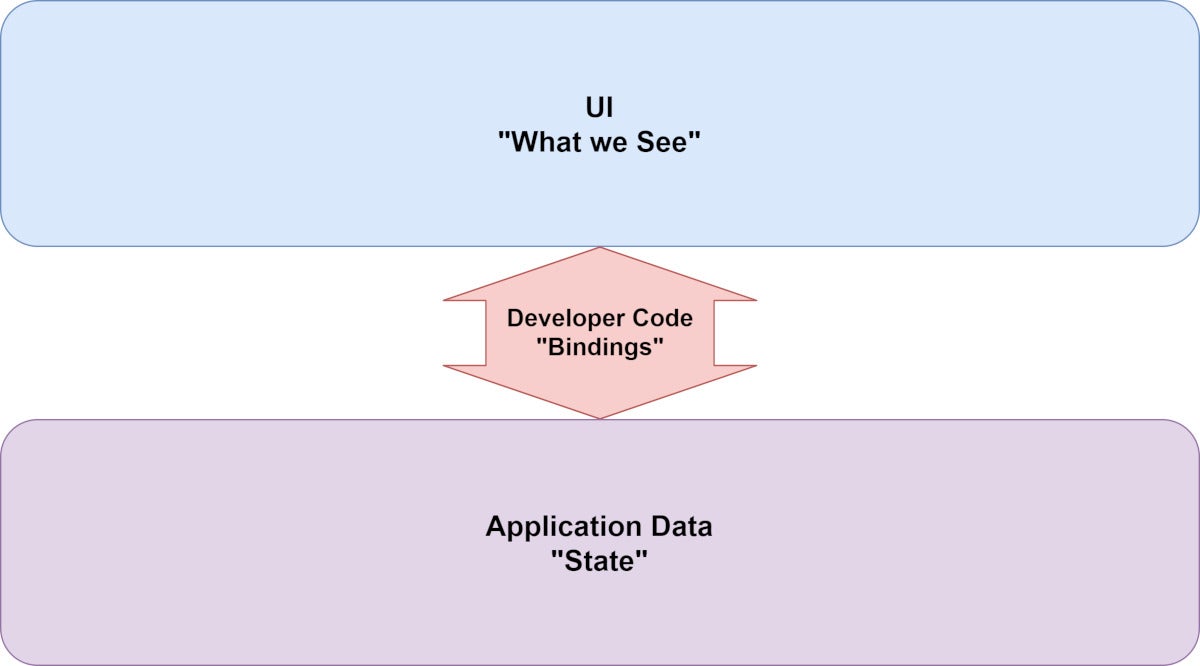
Figure 1 describes how state manifestation is handled without such frameworks. Figure 2 describes how it is handled with the frameworks.
Figure 1. Without data binding
 IDG
IDGFigure 2. With data binding via Angular, React, and Vue
 IDG
IDGComponents
The frameworks also align in being component-based. This is not a new idea: Each area of the user interface is represented by a component. The code in the component determines what is displayed and how the view behaves. Bundling state-driven data binding into components delivers the critical advantage to all three frameworks that makes them superior in complex interfaces to what went before.
Industry adoption profiles
Now we will take a look at the presence of each framework in the industry, to get a look at the level of adoption and viability. What I mean here is, when you choose a framework for a new project, or decide on which framework to learn, you want to be sure you are adopting a framework that is going to be successful over the long term.
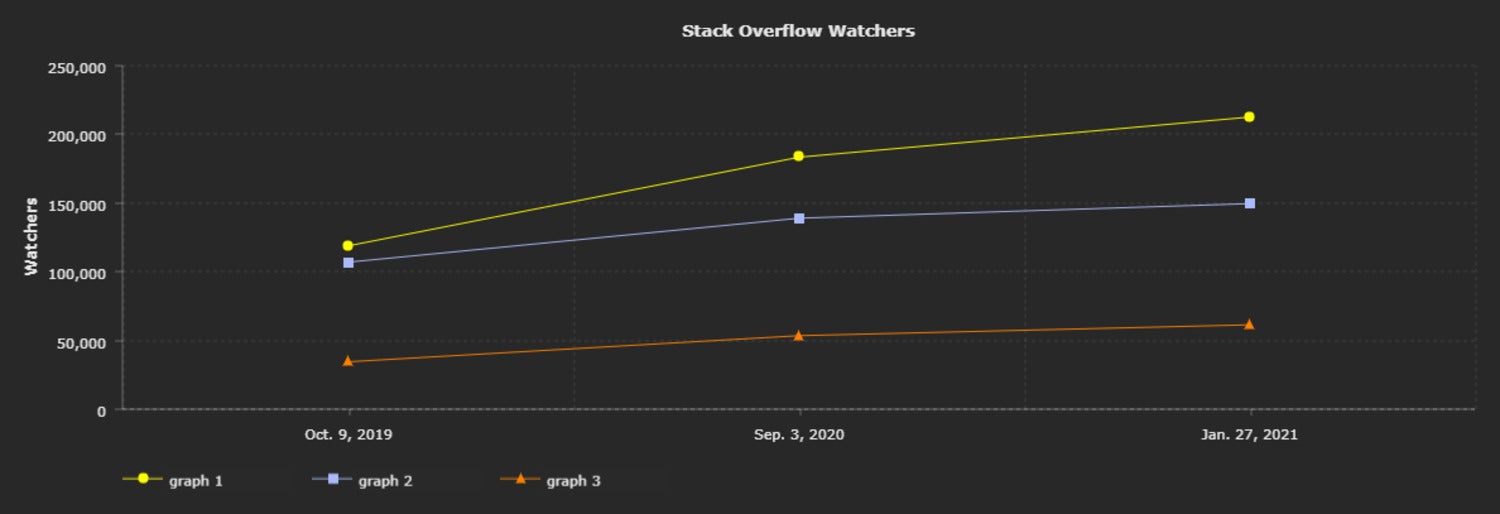
Figure 3 looks at the number of watchers each framework has on Stack Overflow. A few things are clear from this chart. All three frameworks have a strong presence on Stack Overflow, although Vue is far behind with just over 50,000 watchers. ReactJS has a commanding lead, which has increased over the past year.
Figure 3. Stack Overflow Watchers
IDG
Figure 4 looks at GitHub stars. Here Angular takes last place, lagging far behind. Interestingly, Vue is in the lead, and well ahead of React, indicating a great deal of curiosity (if not actual use) in the project. In each case, over the last year, the frameworks have shown increasing interest at about the same rate.
Figure 4. GitHub Stars
IDG
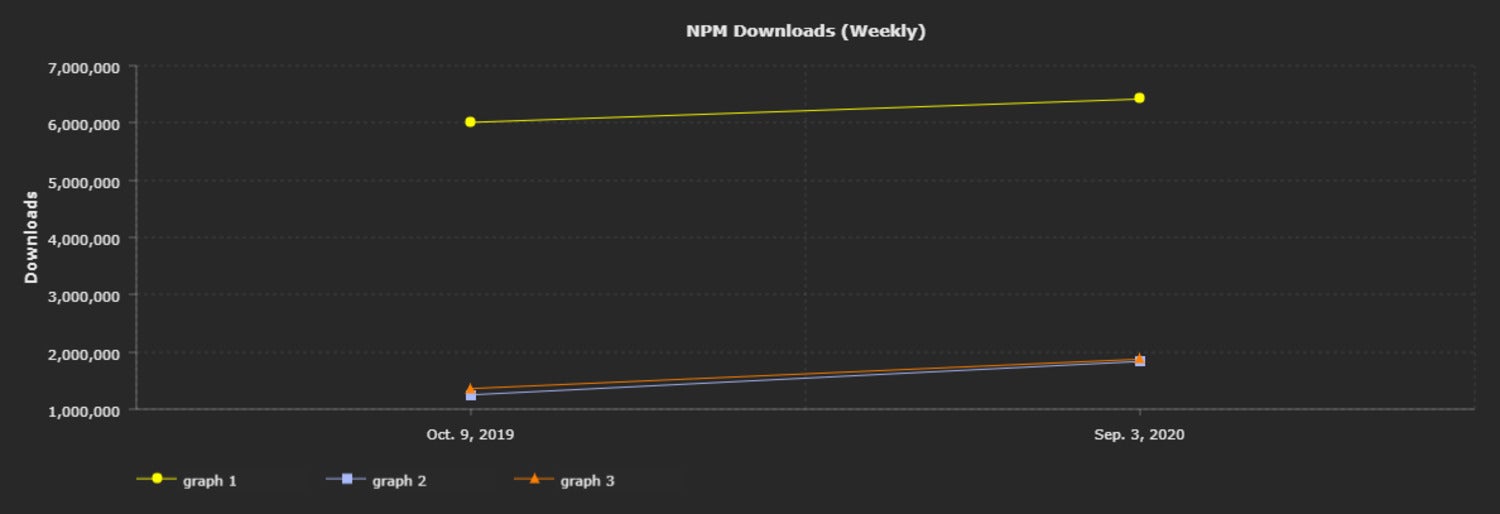
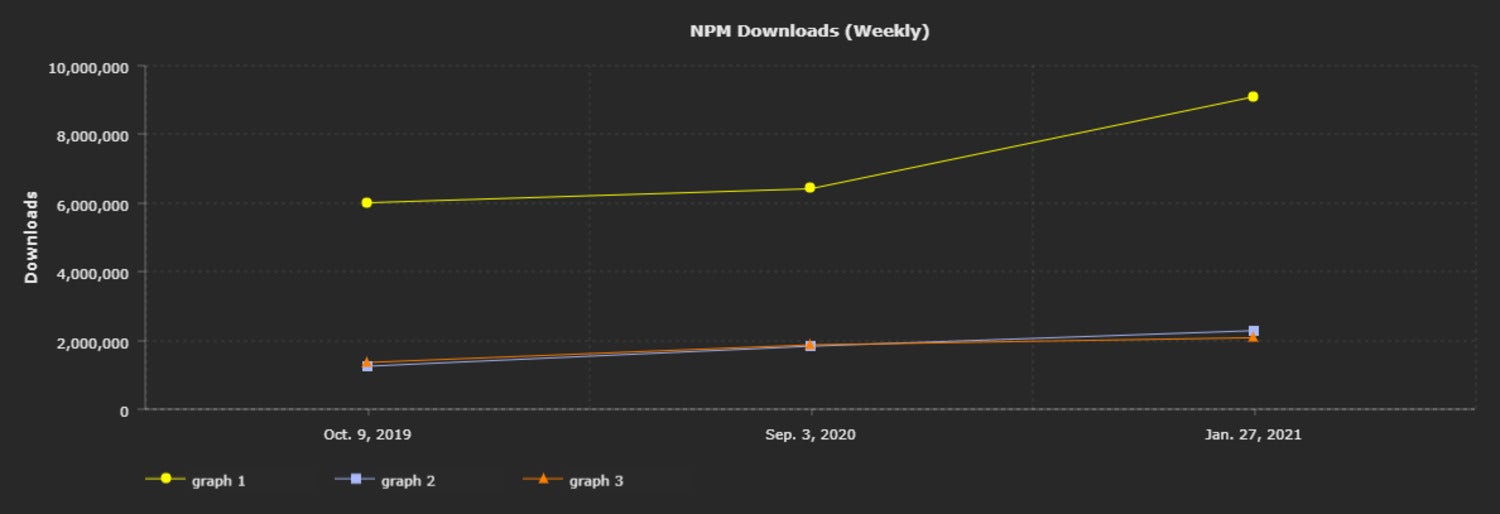
GitHub stars tend to reflect people’s theoretical interest in a project. Figure 5 looks at weekly NPM downloads, which is an indicator of active, practical use of the projects.
Popularity take-away
Each of these frameworks appears to have enough up-take to be long-term viable. React’s popularity means it is easier to find developers who know it, and easier to find employers that are hiring for it.
Figure 5. NPM downloads (weekly)
IDG
The fact that leaps out in Figure 5 is that the actual active use of frameworks goes to ReactJS by a landslide. React has almost twice as many weekly downloads as the other two frameworks combined. It’s no surprise that React is the most in-use framework, but it’s notable just how significant its lead is.
Technical comparison
You’ve seen how the frameworks are conceptually similar, and had a look at their relative presence in the industry. Now let’s have a look at their technical aspects.
Angular
Angular 2+ was “designed from above.” That is, a bunch of smart people sat down and decided what would make for the ultimate front-end JavaScript framework.
In many ways, they succeeded: Angular is a very complete framework. On the other hand, Angular can feel overwhelming to learn and use the framework, as you are immediately required to master a large set of interacting elements (services, dependency injection, etc.) to achieve anything.
Angular is intended to incorporate everything you might need to develop large-scale front ends. In comparison, React relies upon community-developed plug-ins (for router support, for instance).
Ultimately, you as a developer are inside a code-thought-machine that wants you to conform to its ideals and conventions.
On the plus side, the wholesale adoption of ReactiveX (RxJS) across the board is innovative and forward-thinking. Not only does it mean all the event handling needs (intra-component, inter-component, back-end service calls, etc.) are managed via the same mechanism, but the same well-built framework (ReactiveX) and its learning will transfer to any other language you can imagine.
Moreover, large-scale projects with many team members may benefit from the more rigid and well-defined architectural style present in Angular.
There are varying opinions about the benefits and drawbacks of TypeScript, but you will code and read TypeScript if you use Angular. Another executive up-front decision.
Angular adopts ECMAScript classes wholesale. These classes use the built-in state as the component state. These are decorated with annotations to define their metadata.
Views in Angular are similar to views in Vue in that they are straight HTML templates with additional data-binding and logic support via inline directives.
Angular uses NgRX/store as its built-in, centralized state management plug-in.
Angular component example
Listing 2 displays a counter component similar to the React example, and is derived from this example.
@Component({
    selector: 'app',
    template: `
    <button (click)="increment()">Increment</button>
    <button (click)="decrement()">Decrement</button>
    <div></div>
    {{counter}}
`
})
export class App {
    public counter : number = 0;

    increment(){
      this.counter += 1;
    }

    decrement(){
      this.counter -= 1;
    }
}

bootstrap(App, []);
Notice the @Component annotation. This is a “decorator” that informs Angular that the JavaScript class that follows is a component. Other features like services are handled in a similar fashion.
Also observe that the state is handled as a class member: public counter. This is a fairly clean way to build components atop JavaScript’s native syntax.
The interactive part of the component is added to the button elements via the (click) directive that is analagous to the DOM method onClick, but allows for calling methods on the component class. In this case it executes the increment and decrement methods.
Finally, the inline token {{counter}} allows for outputting the data-bound variable. This is slightly different from React’s syntax, but almost the same, and serves the same purpose.
React
React’s strength is that it has organically grown up from in-the-world use and has continued to develop in response to heavy usage. It has undergone extensive growth, but its roots and ongoing advantages reside in its being a framework used by Facebook for its own applications.
You can see Facebook’s committment to driving innovation in the framework with forward-looking features like Concurrent Mode (still in experimental mode at the time of writing).
React has also aggressively developed what is known as “pure” or functional components and hooks to empower them. These components avoid some of the overhead of class-based components. Vue has some support for functional components, and it is possible to create them in Angular, but React is the clear leader in this area.
Component definition and interactions are relatively straightforward in React, honoring the principle of least surprise.
As long as you avoid unnecessary Redux usage, the handling of React with a large-scale application is as good as Vue. Angular handles large code bases in a consistent manner and can offer benefits over React in this area. It is possible to define elegant large-scale apps in React, but the framework itself isn’t going to do as much as Angular to enforce that definition.
React uses an immutable state object accessible only via setState() to represent component state. This is different from Vue and Angular, which employ a more built-in JavaScript approach to state data.
React employs JSX for its view templates. JSX is an interesting approach in that it is like HTML with JavaScript superpowers (or JavaScript with HTML superpowers, if you prefer). JSX can be a bit off-putting when first learning the framework. It works quite well in the long run and is not difficult to learn if you arleady know HTML and JavaScript.
React’s default centralized data management is handled via Redux.
React component example
Listing 1 has a simple component example in React, derived from the React docs. This is a functional component, as that is the primary way to build components going forward.
import React, { useState } from 'react';

function Example() {
  const [count, setCount] = useState(0);

  return (
    <div>
      <p>You clicked {count} times</p>
      <button onClick={() => setCount(count + 1)}>
        Click me
      </button>
    </div>
  );
}
Notice how the state is handled via the useState “hook.” This exposes the setCount() method to the template. The template is returned by the actual component function, and is written in JSX. JSX allows the inline integration of the JavaScript function into the onClick attribute of the button element, which interacts with the component state. The state is also accessed via the {count} token in the template markup.
Vue
Vue adopts a “normal JSON object as state” philosophy. Any time you can just use the language itself, it’s a win for simplicity. So you’ll find Vue simpler in this respect than React’s setState(), for example. However, there are edge cases and caveats that ultimately mean you are dealing with a native-JSON-hybrid beast.
In a sense, Vue is somewhere between Angular and React, a compromise between Angular’s top-down design and React’s organic growth.
Despite being the newest contender, and lacking the backing of a large corporation, Vue has kept pace with developments and delivers a fully viable framework. Also, there are a number of quality plug-ins and kits for Vue (like Quasar and Vuetify).
Vue has a reputation for being the easiest to learn. That probably derives from its JSON data model and HTML-with-decoration view definitions (versus React’s JSX). Vue templates can also incorporate inline JavaScript functions, unlike JSX.
Vue offers Vuex as its built-in, centralized state management solution.
Vue component example
Listing 3 shows a simple component definition in Vue, from the Vue docs.
// Define a new component called button-counter
Vue.component('button-counter', {
  data: function () {
    return {
      count: 0
    }
  },
  template: '<button v-on:click="count++">You clicked me {{ count }} times.</button>'
})
In Listing 3, you can see that the component is exported as a CommonJS module. This is the Vue idiom for defining the component code. The template is identified as the template member.
Within the object that the module exports is the data member. This is a function that returns an object defining the component’s state.
Notice that the template allows for HTML with inline directives like v-on:click, similar to Angular’s (click) or React’s onClick. The syntax in Vue for outputting bound variables is the same as Angular: {{count}}.
Performance comparison
Performance can be tricky to get a handle on. This excellent article offers a data-based comparison of the three frameworks in three areas: DOM manipulation, load time, and memory allocation.
In the categories: Angular wins for DOM manipulation (in most cases); Vue wins for load times; React and Angular win for memory allocation.
In general, it’s not terribly valuable to make a performance-based decision among the frameworks. How you use them will make the biggest impact on performance.
Native support and server-side rendering
Although Vue and Angular also support to-native features and server-side rendering, React seems to be keeping well ahead in terms of the simplicity in using these. JSX has a good feel for me personally, in that it keeps related code and layout close together. Others have had a less happy experience with it. Overall, I count JSX as a positive for React.
Which framework to use?
The question as to which technology is best is impossible to say definitively. There are quantitative differences, but in the end it is a qualitative decision.
As with many technology choices, external factors can play a big role. In particular, your familiarity with the frameworks and that of your team will weigh heavily. Availability of developers who know the tech is also important, and in that arena, React is the clear winner. The React project also seems the most committed to offering forward-looking innovations.
Microsoft, Google address browser compatibility issues
Microsoft and Google are partnering to promote web browser compatibility around a number of CSS (Cascading Style Sheets) features, with an effort called #Compat2021.
Also involving open source software consulting firm Igalia and the broader web community, #Compat2021 aims to improve compatibility in five specific areas:
- CSS Flexbox, a CSS module that defines a CSS box model optimized for user interface design and the layout of items in a single direction.
- CSS Grid, for dividing a page into regions or defining the relationship in terms of layer, position, and size, between parts of a control built from HTML primitives.
- CSS Position: sticky, or sticky positioning, which is akin to a hybrid of relative and fixed positioning.
- CSS aspect-ratio property, pertaining to a CSS property setting a preferred aspect ratio for the box, to be used in the calculation of auto sizes and other layout functions.
- CSS transforms, for rotating, scaling, skewing, or translating an element.
The joint working group involved in the project identified these focus areas based on the number of related bugs in each vendor’s tracking system, feature usage data, survey feedback, CanIUse data, and web-platform-tests test results.
While working group members will focus on their respective implementations, the Microsoft Edge team plans to contribute fixes to the Google-sponsored Chromium project to pass all CSS Grid tests in 2021 and to support improving interop across browsers.
#Compat21 was announced on March 22. Progress on the project can be tracked on the Compat 2021 dashboard.